20 Best Jund Commanders: Black-Red-Green Decks Ranked
By ElderArticles · Updated 11/20/2026 · 23 min read
Explore the 20 best Jund commanders, ranked with black-red-green strategies, four synergy cards per pick, key rules tips, and practical deckbuilding advice.
Table of contents
Jund can turn a sacrificed creature into cards, a spent land into another landfall trigger, or a handful of tokens into lethal damage. The challenge is choosing which of those plans your commander should actually support.
The best Jund commanders combine black, red and green in very different ways. Korvold rewards almost any sacrifice; Henzie makes large creatures fast and disposable; Lord Windgrace rebuilds through lands. A Dragon deck, a counter deck and a graveyard engine can share these colors without wanting the same 99 cards.
Here are 20 ranked picks, each with four synergy cards, a clear reason to choose it, and a rule or limitation to keep in mind.
How we ranked the best Jund commanders
This is an editorial ranking for four-player Commander, from focused casual builds through optimized decks. It is not a cEDH tier list, a popularity chart or a claim about tournament win rates.
We prioritized consistency, recovery after disruption, and how much the commander contributes to its own strategy. Commanders that supply cards, material or mana with broadly useful support rank above options that need several narrow pieces before doing anything. A lower-ranked commander can still be the better choice for the game you want to play.
All 20 commanders and the recommended synergy cards were checked for Commander legality and color identity on November 18, 2026, using Scryfall card data and Wizards’ current banned list. These are build directions, not fixed power ratings; tutors, fast mana and compact combos can change the experience substantially.
Quick picks by playstyle
Best overall sacrifice engine: Korvold, Fae-Cursed King.
Best for creature value and aggressive play: Henzie "Toolbox" Torre.
Best for land sacrifice: Hearthhull, the Worldseed. For a planeswalker-led lands deck, choose Lord Windgrace.
Best for repeatable reanimation: Slimefoot and Squee.
Best for a dedicated Dragon deck: Karrthus, Tyrant of Jund.
Best for unusual counters: Auntie Ool, Cursewretch.
Best for a straightforward combat plan: Mr. Orfeo, the Boulder.
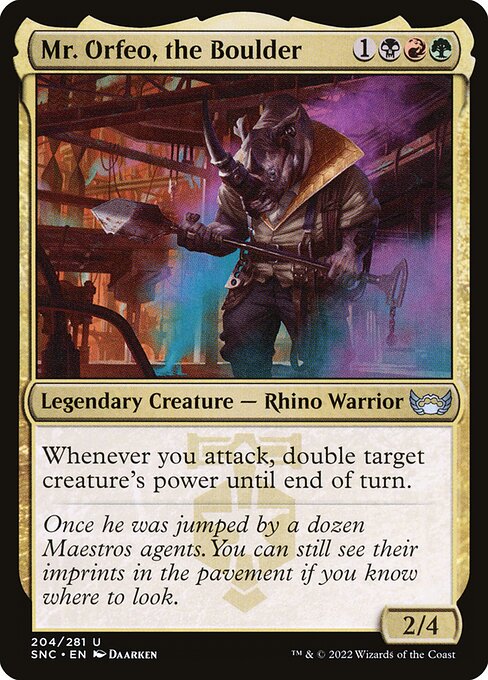
#20. Mr. Orfeo, the Boulder
Mr. Orfeo, the Boulder | Illustration by Daarken
Best for: Big creatures and straightforward combat.
Mr. Orfeo doubles a creature’s power whenever you attack, even if Orfeo stays safely out of combat. That makes him an approachable way to turn one substantial attacker into a serious threat. He ranks twentieth because he supplies neither cards nor protection: the rest of the deck must keep the attackers coming and help them connect.
Four synergy cards to start with:
Yargle and Multani starts at 18 power, giving Orfeo an enormous number to double.
Garruk's Uprising gives your creatures trample and rewards large creatures entering with card draw.
Rishkar's Expertise turns your largest creature’s power into a fresh hand after combat, while Orfeo’s boost still lasts.
Fling converts a boosted creature into direct damage when attacking alone is insufficient.
Watch for: Doubling power does not double toughness or grant trample. Fling deals noncombat damage, so it does not count toward the 21 combat damage needed for a commander-damage loss.
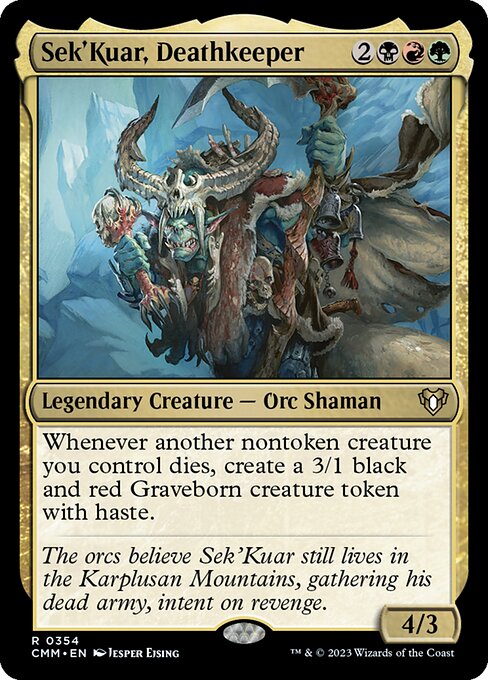
#19. Sek'Kuar, Deathkeeper
Sek'Kuar, Deathkeeper | Illustration by Jesper Ejsing
Best for: Creature deaths that leave an attacking army.
Sek’Kuar replaces your other dying nontoken creatures with hasty 3/1 Graveborn tokens. A sacrifice deck can therefore trade away its utility creatures without surrendering all its pressure. He earns a place for resilience and an actual combat plan, but five mana and no built-in sacrifice outlet make his setup slower than the strongest Jund engines.
Four synergy cards to start with:
Reassembling Skeleton provides a nontoken creature you can repeatedly return and sacrifice, as mana allows.
Viscera Seer lets you choose when creatures die while improving your next draw.
Zulaport Cutthroat adds life loss to deaths, including the eventual deaths of your Graveborn tokens.
Evolutionary Leap turns a disposable creature into another creature card while Sek’Kuar leaves a token behind.
Watch for: Sacrificing a Graveborn token does not create another Graveborn. Sek’Kuar specifically needs another nontoken creature you control to die.
#18. Shattergang Brothers
Shattergang Brothers | Illustration by Kev Walker
Best for: Repeatable sacrifice-based control.
Shattergang Brothers let you exchange one of your creatures, artifacts or enchantments for the same kind of sacrifice from each opponent. That can generate a substantial multiplayer advantage when your own permanent is expendable. The limitation is efficiency: every activation costs three mana, and opponents choose what they lose. This is an attrition commander, not precision removal.
Four synergy cards to start with:
Reassembling Skeleton keeps supplying material for the creature ability.
Ichor Wellspring draws on entry and again when sacrificed to the artifact ability.
Rancor returns to your hand after you sacrifice it from the battlefield to the enchantment ability.
Awakening Zone makes a fresh creature token on each of your upkeeps for future sacrifices.
Watch for: A permanent with multiple types still pays for only one activation when sacrificed. You cannot use the same sacrifice to pay two different costs.
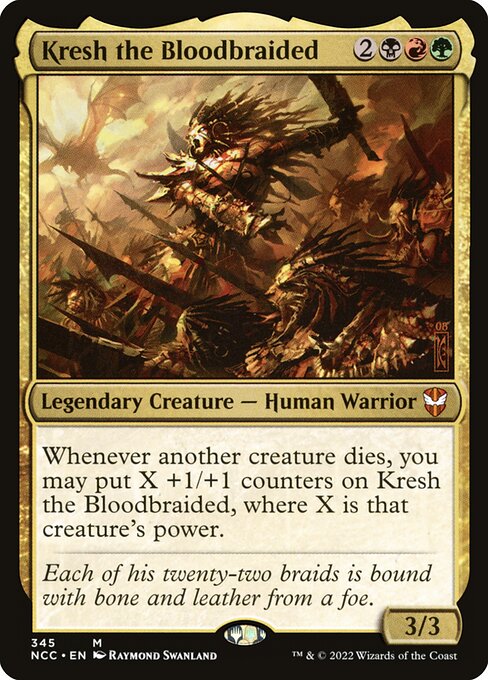
#17. Kresh the Bloodbraided
Kresh the Bloodbraided | Illustration by Raymond Swanland
Best for: Turning a messy battlefield into one enormous attacker.
Kresh grows when another creature dies, regardless of who controlled it, using that creature’s power. He rewards the removal and sacrifice effects Jund already wants to play. His ceiling is spectacular, but he must accumulate counters and then find a way through blockers. Losing him to removal also loses the stored power, which keeps him below commanders that bank cards or mana.
Four synergy cards to start with:
Plaguecrafter creates multiple potential deaths while disrupting opponents.
Greater Good turns a large creature—or Kresh himself in an emergency—into cards before the investment disappears.
Temur Battle Rage gives double strike and, when its power condition is met, trample for a finishing attack.
Chandra's Ignition uses Kresh’s current power to damage opposing creatures and opponents, with subsequent deaths potentially growing him further.
Watch for: Kresh does not grow before Chandra’s Ignition deals its damage. The death triggers resolve afterward, and Kresh must survive to keep the resulting counters.
#16. Karrthus, Tyrant of Jund
Karrthus, Tyrant of Jund | Illustration by Dave Kendall
Best for: Jund Dragons and explosive combat turns.
Karrthus offers the most direct Dragon plan on this list: deploy threatening Dragons, then give the team haste. His entrance can also take every Dragon on the battlefield, a dramatic swing at the right table. Seven mana and limited card advantage make him expensive to build around, but he delivers a clear finishing turn for players who want Dragons rather than a sacrifice engine.
Four synergy cards to start with:
Lathliss, Dragon Queen adds a 5/5 Dragon token whenever another nontoken Dragon enters under your control.
Scourge of Valkas turns each incoming Dragon into damage that scales with your Dragon count.
Dragon Tempest provides earlier haste and another Dragon-entry damage payoff.
Dragonlord Atarka combines a large evasive body with removal when it enters.
Watch for: An opponent’s copy of Karrthus can steal your Dragons with its own entrance trigger. Also, gaining control of a Dragon is not the same as that Dragon entering the battlefield.
#15. Xira, the Golden Sting
Xira, the Golden Sting | Illustration by Mila Pesic
Best for: Combat-triggered aristocrats with evasive tokens.
Xira marks another creature with an egg when she attacks. When that creature later dies with an egg counter, you draw a card and receive a flying Insect. Haste lets her begin immediately, and she does not need to deal combat damage to place the egg. She ranks here because one marked creature per attack is slower than the broader death and sacrifice engines above her.
Four synergy cards to start with:
Sakura-Tribe Elder can carry an egg, then sacrifice itself for a land and Xira’s reward.
Viscera Seer lets you cash in your own marked creature at a useful moment.
Skullclamp converts the resulting 1/1 Insects into two cards apiece when they die equipped.
Bastion of Remembrance adds a drain payoff as your marked creatures and Insects die.
Watch for: Xira cannot target herself or a creature that already has an egg counter. Exiling a marked creature does not count as it dying.
#14. Indoraptor, the Perfect Hybrid
Indoraptor, the Perfect Hybrid | Illustration by Daren Bader
Best for: Group damage and unpredictable enrage pressure.
Indoraptor rewards you for damaging opponents before casting it, then turns damage dealt to it into a threat against a randomly chosen opponent. Three mana makes it easy to deploy after setup, and menace gives the growing body a combat role. Random selection and an opponent’s option to sacrifice a nontoken creature make the payoff less controllable than targeted removal or guaranteed drain.
Four synergy cards to start with:
Flame Rift damages all players; in a four-player game, an unprevented Rift deals 12 total damage to your three opponents for bloodthirst.
Marauding Raptor discounts the generic part of Indoraptor’s cost and deals damage to it on entry, triggering enrage.
Blasphemous Act can clear creatures while triggering enrage from its damage event.
Heroic Intervention can preserve Indoraptor through damage-based removal while still allowing damage to trigger enrage.
Watch for: Thirteen damage from one Blasphemous Act produces one enrage trigger, not thirteen. Indoraptor’s triggered damage is not commander combat damage, and you do not choose the opponent.
#13. Vaevictis Asmadi, the Dire
Vaevictis Asmadi, the Dire | Illustration by Steven Belledin
Best for: Permanent-heavy decks and top-of-library manipulation.
Whenever Vaevictis attacks, you choose a permanent for every player to sacrifice, including yourself. Those players then reveal their top card and put it onto the battlefield if it is a permanent. You can turn a token into a major threat while removing opposing problem cards. The six-mana commander must attack to begin, and opponents can reveal excellent replacements, so the deck needs deliberate setup.
Four synergy cards to start with:
Sensei's Divining Top helps arrange a useful permanent on top before the attack trigger resolves.
Scroll Rack can put an expensive permanent from your hand on top of your library.
Awakening Zone supplies a token you can exchange rather than sacrificing a valuable permanent.
It That Betrays adds a second payoff when opponents sacrifice nontoken permanents.
Watch for: You do not get to choose what opponents reveal. An instant or sorcery revealed this way stays on top; Vaevictis does not automatically mill it.
#12. Yurlok of Scorch Thrash
Yurlok of Scorch Thrash | Illustration by Jesper Ejsing
Best for: Group slug and pressure on opponents’ mana use.
Yurlok makes losing unspent mana cost life and can give every player black, red and green mana. That creates unusual timing decisions, but it also hands your opponents real resources. He belongs in a deck that pressures life totals and understands when opponents can spend the mana. His distinctive game plan ranks well for identity, while the symmetrical assistance limits his consistency.
Four synergy cards to start with:
Citadel of Pain punishes leaving lands untapped at the beginning of an end step, while Yurlok makes simply floating the mana risky.
Manabarbs adds a life cost to tapping lands for mana.
Havoc Festival accelerates the life-total pressure and prevents lifegain from undoing it.
Rhythm of the Wild can give Yurlok haste so his mana ability is available immediately.
Watch for: Receiving mana does not immediately cause life loss. Players lose life only when they actually lose unspent mana, and they can spend the gift on spells or abilities when timing allows.
#11. Disa the Restless
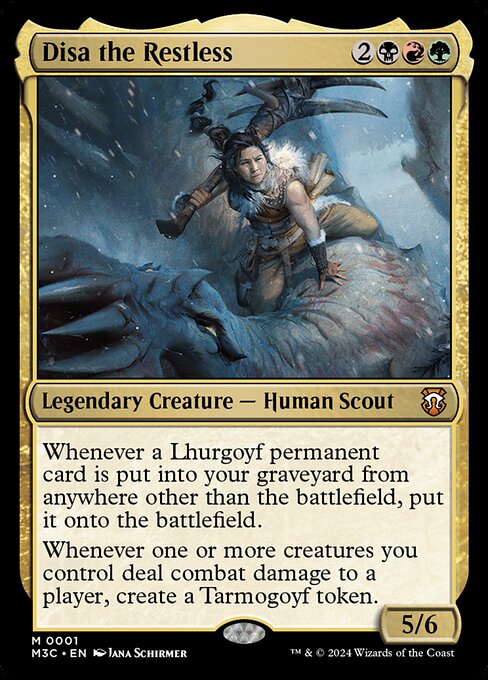
Disa the Restless | Illustration by Jana Schirmer
Best for: Lhurgoyfs, discard and graveyard setup.
Disa turns Lhurgoyf permanent cards entering your graveyard from somewhere other than the battlefield into creatures on the battlefield. She also makes Tarmogoyf tokens when your creatures deal combat damage to players. That combines graveyard development with combat pressure. She sits outside the top ten because the first ability needs a focused card pool or a type-changing support piece, and she costs five mana.
Four synergy cards to start with:
Buried Alive can put three suitable creature cards into your graveyard and trigger Disa for each Lhurgoyf.
Maskwood Nexus makes your creature cards outside the battlefield every creature type, greatly expanding Disa’s options.
Tortured Existence lets you discard a Lhurgoyf while returning another creature card to your hand.
Pyrogoyf turns your Lhurgoyfs entering into damage as well as board presence.
Watch for: A Lhurgoyf dying from the battlefield does not trigger Disa’s first ability. Her combat trigger is once per player damaged in that combat-damage event, not once per creature connecting.
#10. Soul of Windgrace
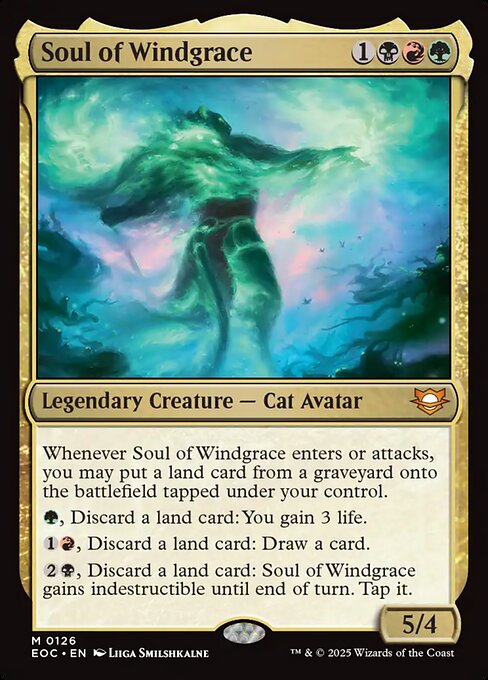
Soul of Windgrace | Illustration by Liiga Smilshkalne
Best for: Lands value with an attacking commander.
Soul of Windgrace retrieves a land from any graveyard when it enters or attacks. It can also discard lands for life, cards or temporary indestructibility. This makes a flexible midrange commander: you get value on arrival, have a reason to attack, and can use spare lands productively. It ranks below Lord Windgrace because repeated land recovery is more dependent on combat or additional support.
Four synergy cards to start with:
Life from the Loam refills your hand with lands to replay or discard to Soul’s abilities.
Entish Restoration puts a land in the graveyard while ramping; Soul’s five power meets its larger-search condition if Soul remains on the battlefield.
Ramunap Excavator lets you play lands from your graveyard alongside Soul’s triggered recovery.
World Shaper stocks the graveyard through attacks and returns your land cards when it dies.
Watch for: Soul puts the recovered land onto the battlefield tapped. Its indestructibility ability taps Soul, but tapping is an effect rather than a cost, so you can activate it even when Soul is already tapped.
#9. The Beamtown Bullies
The Beamtown Bullies | Illustration by Tyler Jacobson
Best for: Harmful gifts and graveyard-based disruption.
The Bullies give a nonlegendary creature from your graveyard to the opponent whose turn it is. Haste, goad and delayed exile make ordinary gifts temporary attackers; creatures with disastrous entrance abilities turn the same ability into a much sharper weapon. The ceiling is high, but the deck can draw awkward payloads and attract immediate attention. Its narrow setup keeps it below more broadly useful engines.
Four synergy cards to start with:
Entomb finds the exact creature you want to give away.
Buried Alive stocks several possible gifts so you can adapt to the table.
Leveler exiles its new controller’s library when it enters.
Eater of Days makes its new controller skip their next two turns.
Watch for: You cannot activate the ability on your own turn because it needs an opponent whose turn it is. Gifts must be nonlegendary. Leveler does not cause an immediate loss merely by emptying a library; a player normally loses when they try to draw from an empty one.
#8. Auntie Ool, Cursewretch
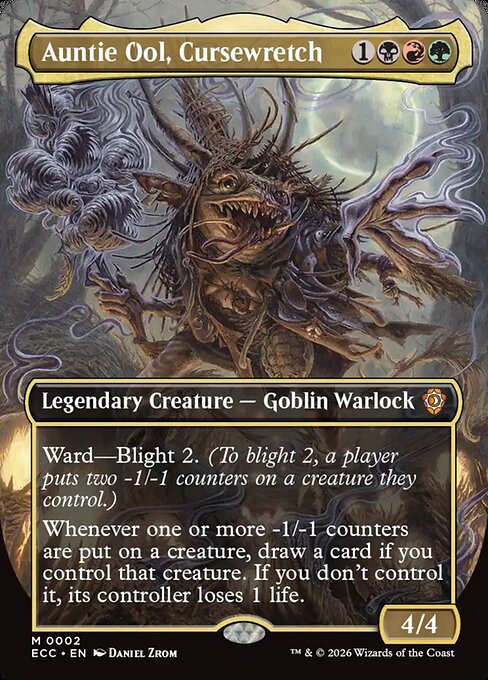
Auntie Ool, Cursewretch | Illustration by Daniel Zrom
Best for: Minus-one counters, card draw and attrition.
Auntie Ool draws cards when one or more -1/-1 counters are put on a creature you control and makes an opposing creature’s controller lose life when counters are put on their creature. This turns both self-inflicted counters and removal into resources. Four mana and an engine that does not require combat earn a high ranking, although the deck needs specialized counter sources and must manage its own shrinking creatures.
Four synergy cards to start with:
Hapatra, Vizier of Poisons adds deathtouch Snake tokens when you put -1/-1 counters on creatures.
Nest of Scarabs creates Insects according to the number of -1/-1 counters you place.
Black Sun's Zenith spreads counters across the battlefield, potentially generating multiple Ool triggers while acting as a sweeper.
Devoted Druid puts a counter on itself to untap, supplying mana and a card-draw trigger while its toughness permits.
Watch for: Ool triggers once for each creature receiving one or more counters in an event, not once per individual counter. A large Zenith can also kill Ool and your own board; plan the recovery.
#7. Ziatora, the Incinerator
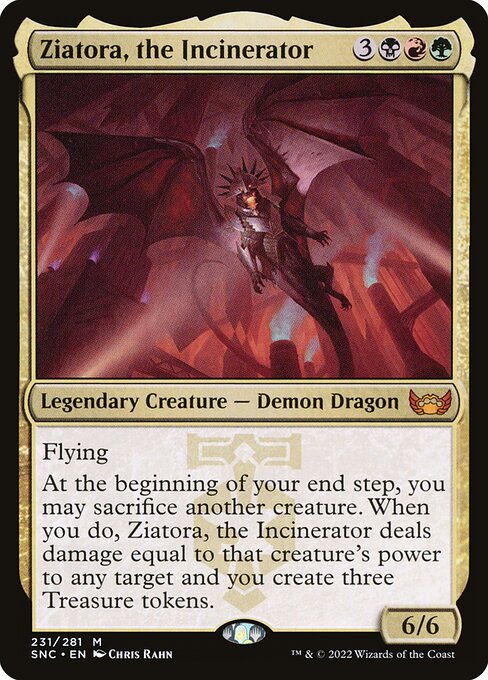
Ziatora, the Incinerator | Illustration by Chris Rahn
Best for: Large creatures, sacrifice damage and Treasure.
Ziatora turns another creature into damage and three Treasures at the beginning of your end step. That links a finishing plan to the resources for your next play: deploy a threat, use it if possible, then convert it into damage and mana. She costs six, but can deliver value on the turn she enters without attacking. Her once-per-end-step timing is the main constraint.
Four synergy cards to start with:
Yargle and Multani provides 18 power for a particularly threatening sacrifice.
Malignus scales its power with the highest opposing life total, creating another large damage payload.
Stalking Vengeance adds a separate damage trigger when another creature you control dies.
Reanimate returns a large creature from a graveyard so you can use it again, at a life cost.
Watch for: Ziatora, rather than the sacrificed creature, deals the damage from her ability. Malignus’s own damage-prevention restriction therefore does not make Ziatora’s damage unpreventable. You also cannot sacrifice several creatures to one end-step trigger.
#6. Slimefoot and Squee
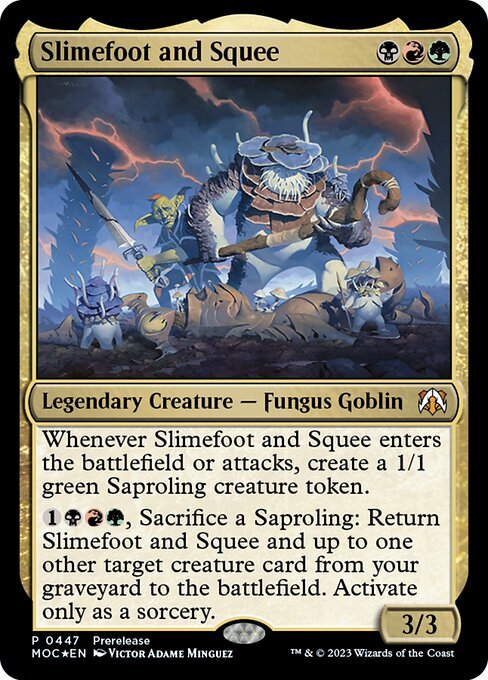
Slimefoot and Squee | Illustration by Victor Adame Minguez
Best for: Resilient reanimation with reusable support creatures.
Slimefoot and Squee create a Saproling when they enter or attack. From the graveyard, their activated ability can sacrifice a Saproling to bring them back alongside another creature. That supplies an engine you can rebuild without repeatedly casting the commander. Three mana to deploy and flexible creature targets give the deck a strong foundation, although graveyard hate and losing every Saproling can interrupt it.
Four synergy cards to start with:
Viscera Seer puts Slimefoot and Squee into the graveyard when you are ready to use their return ability.
Spore Frog is a reusable defensive reanimation target against combat decks.
Eternal Witness turns repeated returns into recovery of your most useful cards.
Victimize uses a spare token to return two creature cards and helps rebuild after removal.
Watch for: To activate their return ability, Slimefoot and Squee must be in your graveyard. Choosing the command zone instead removes that option. The ability is sorcery-speed, so this is not an instant-speed Spore Frog loop on every opponent’s turn.
#5. Lord Windgrace
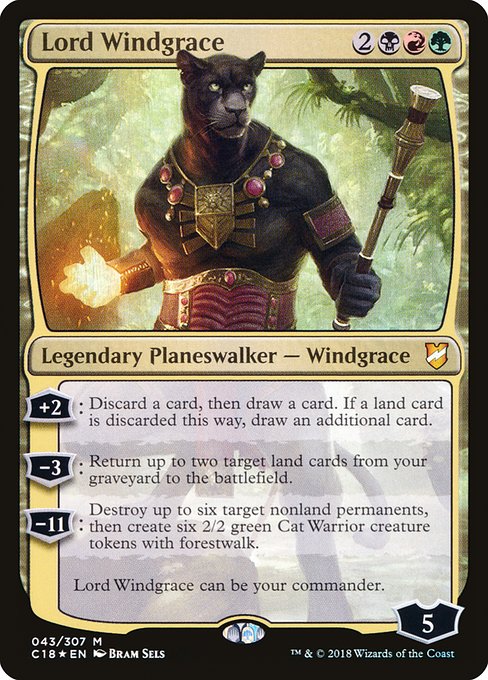
Lord Windgrace | Illustration by Bram Sels
Best for: Lands, graveyard recovery and durable midrange.
Lord Windgrace combines card selection with land recursion in the command zone. Discarding a land to his +2 draws an extra card, while his -3 returns up to two lands directly to the battlefield. That lets the deck treat lands as reusable resources rather than dead late-game draws. He ranks highly for recovery and flexibility, though a planeswalker commander needs creatures or interaction to discourage attacks.
Four synergy cards to start with:
Life from the Loam replenishes land cards to discard and can stock the graveyard through dredge.
Splendid Reclamation returns a large graveyard of lands after you have developed the setup.
Field of the Dead converts land entries into Zombies once you control seven lands with different names.
Titania, Protector of Argoth recovers a land on entry and adds Elementals when your lands go to the graveyard from the battlefield.
Watch for: Returning lands with Windgrace’s -3 is not the same as playing lands, so it does not use your normal land play. He is commander-eligible because his text explicitly says so; this does not make every planeswalker a legal commander.
#4. Prossh, Skyraider of Kher
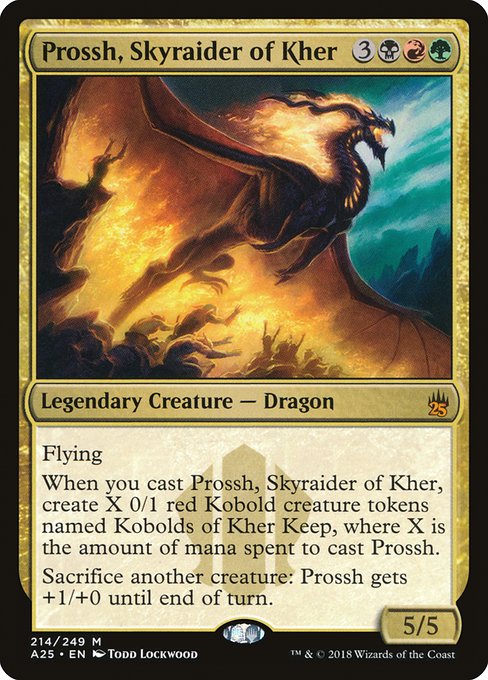
Prossh, Skyraider of Kher | Illustration by Todd Lockwood
Best for: Tokens, sacrifice and optional combo finishes.
Prossh supplies both material and a sacrifice outlet. Casting him creates Kobolds according to the mana spent, and he can sacrifice other creatures to increase his power. That is a remarkably complete package: the tokens can draw cards, fuel other effects or become an army. Six mana is substantial, but the cast trigger and multiple finishing routes make Prossh one of Jund’s most dependable build-arounds.
Four synergy cards to start with:
Skullclamp turns the 0/1 Kobolds into cards when they die equipped.
Purphoros, God of the Forge turns the token wave into damage to every opponent.
Beastmaster Ascension makes attacking with a large token group a credible combat finish.
Food Chain supports repeated commander-casting combo lines by converting creatures into mana restricted to creature spells.
Watch for: Prossh creates tokens when cast, not when reanimated or blinked. Food Chain exiles creatures rather than sacrificing them, so it does not trigger ordinary death or sacrifice payoffs. Choose the combo route to match your table.
#3. Hearthhull, the Worldseed
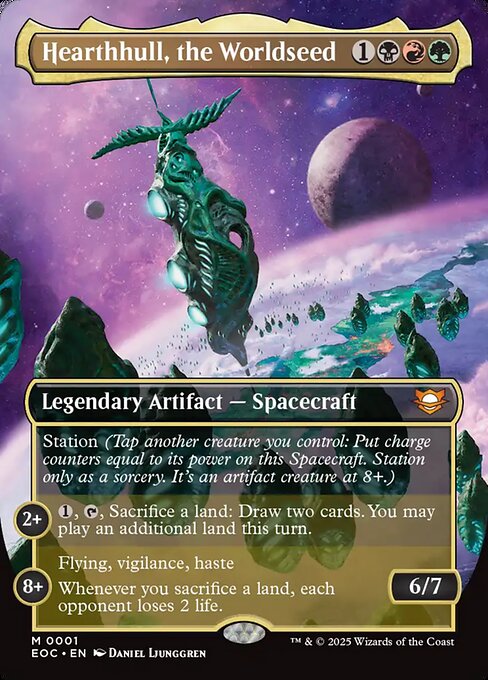
Hearthhull, the Worldseed | Illustration by Daniel Ljunggren
Best for: Land sacrifice, extra land plays and card advantage.
Hearthhull provides an unusually efficient lands engine. At two charge counters, it can tap, spend one mana and sacrifice a land to draw two cards and allow an extra land play that turn. At eight counters, its final section also turns land sacrifices into life loss for each opponent. Card advantage, acceleration and a finishing payoff in one four-mana commander earn it third place; the station setup and land recovery still need support.
Four synergy cards to start with:
Ramunap Excavator lets you use the extra land play to replay a sacrificed land.
Titania, Protector of Argoth turns sacrificed lands into 5/3 Elementals that can also contribute power to station.
Aftermath Analyst mills on entry and can return the accumulated land cards from your graveyard.
Splendid Reclamation provides another mass land-recovery spell after several sacrifices.
Watch for: The life-loss ability belongs to the eight-counter section; it is not active immediately. Station is sorcery-speed. Hearthhull is commander-eligible under the rule for legendary Spacecraft with printed power and toughness.
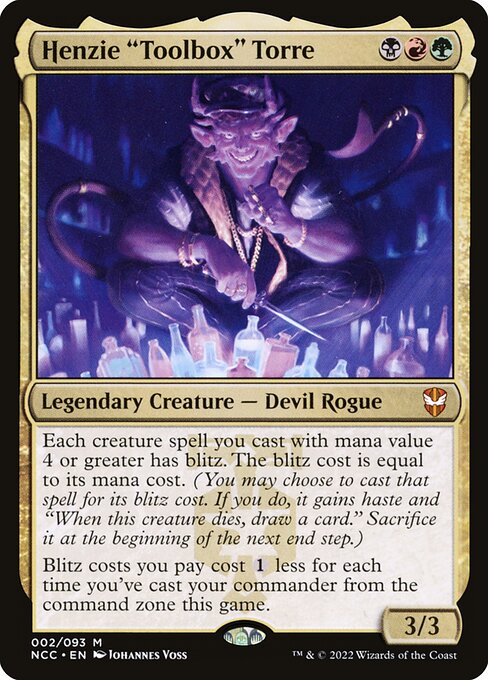
#2. Henzie "Toolbox" Torre
Henzie ’Toolbox’ Torre | Illustration by Johannes Voss
Best for: Creature value, blitz and aggressive reanimation.
Henzie gives your creature spells with mana value four or greater blitz, then discounts blitz costs for each time you have cast your commander from the command zone. The resulting creatures arrive with haste and replace themselves when they die. This makes a cohesive deck from creatures that already have useful entrance, attack or death abilities. Henzie takes second because his three-mana engine makes an ordinary sequence of creatures productive without needing a narrow combo.
Four synergy cards to start with:
Solemn Simulacrum ramps on entry, then supplies both its own death draw and the blitz death draw.
Junji, the Midnight Sky adds a powerful death choice, including returning a non-Dragon creature from a graveyard.
Woodfall Primus destroys a noncreature permanent on entry and can return through persist after its first death.
Greater Good lets you sacrifice a blitzed threat for power-based card draw before the scheduled end-step sacrifice.
Watch for: Blitz discounts reduce generic mana, not colored requirements. Reanimating a creature does not give it blitz. A creature exiled instead of dying also does not provide the blitz death draw.
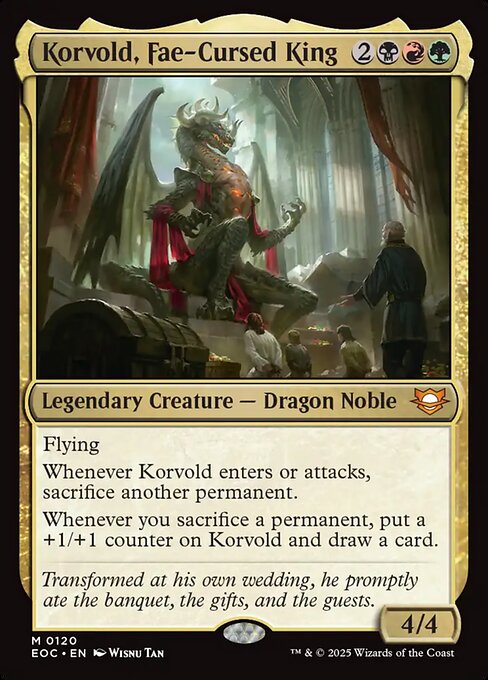
#1. Korvold, Fae-Cursed King
Korvold, Fae-Cursed King | Illustration by Wisnu Tan
Best for: Broad sacrifice engines with the strongest card-advantage foundation.
Korvold rewards every permanent you sacrifice with a card and a +1/+1 counter. Creatures, Treasures, fetch lands and other expendable permanents all become useful fuel, while his flying body grows into a closing threat. He takes first because so many individually playable cards naturally advance the engine. The drawback is visibility: an unchecked Korvold can snowball rapidly, so expect removal and build enough ramp and draw to function without him.
Four synergy cards to start with:
Sakura-Tribe Elder becomes ramp, a card and a counter when sacrificed with Korvold on the battlefield.
Pitiless Plunderer turns other creature deaths into Treasures, creating another permanent to sacrifice later.
Mayhem Devil adds targeted damage to sacrifices, including those made by opponents.
Chatterfang, Squirrel General adds Squirrels to your token production and offers a way to sacrifice them for creature interaction.
Watch for: Korvold rewards sacrificing any permanent, but does not let you sacrifice arbitrary permanents whenever you want. You still need an outlet or a cost that instructs you to sacrifice. Destroying or discarding a card is not sacrificing it.
How to build a Jund Commander deck that works
Pick one main engine. A sacrifice deck needs expendable permanents, sacrifice outlets and payoffs. A lands deck needs land recovery and ways to benefit from repeated land entries or sacrifices. A Dragon deck needs enough early mana and card draw to reach its threats. Begin with the commander’s plan before adding every appealing Jund card you own.
Make the first four turns productive. As a starting point, consider 36–38 lands and roughly 8–12 ramp sources, then adjust for your curve and land strategy. Ignoble Hierarch fixes all three Jund colors, Sakura-Tribe Elder ramps while serving sacrifice plans, and Nature’s Lore finds a Forest card. Prioritize access to the colors needed for your early spells, not just a high total land count.
Separate drawing cards from spending them. A hand full of sacrifice payoffs does little without material, and a hand full of giant creatures needs a way to cast them. Include card advantage that works while your commander is absent. Look for cards that fill two useful roles, such as Solemn Simulacrum providing ramp and a death payoff.
Keep interaction that fits the table. Beast Within answers a broad range of permanents, while Rakdos Charm offers graveyard interaction, artifact removal or a way to punish a large creature army. Add sufficient creature removal and board wipes alongside the engine. A deck that only develops its own board can lose to a faster plan it never tries to disrupt.
Choose a real finish. Korvold can combine sacrifice damage with an enormous flying attacker. Henzie can keep delivering hasty threats. Windgrace can build an army from land payoffs. Decide how your deck ends a game rather than assuming that accumulating value will eventually be enough.
Jund is black, red and green. A Jund commander permits cards whose color identities fit within those three colors, including colorless cards. A card’s color identity can include colored mana symbols in its rules text, not just its casting cost. Hybrid symbols contribute both of their colors; Indoraptor’s black-green hybrid symbol helps give it a full Jund identity.
Which Jund commander should a beginner choose?
Mr. Orfeo is an approachable choice for learning combat, trample and power-based payoffs. Henzie is a strong next step for players who enjoy creatures entering, attacking and dying for value. Start with a coherent creature package and limited moving parts; you do not need to include every combo the colors support.
Is Korvold always the strongest choice?
Korvold is our top overall pick because his card advantage fits so many useful sacrifice effects. That does not make him the best leader for every Jund deck. Karrthus supports a dedicated Dragon plan more directly, while Auntie Ool rewards a counter strategy that Korvold does not specifically enable.
Can Hearthhull and Lord Windgrace really be commanders?
Yes. Lord Windgrace explicitly has permission in its rules text. Hearthhull qualifies under the Commander rule allowing legendary Vehicles and Spacecraft with printed power and toughness. Neither permission means every artifact or planeswalker can lead a Commander deck.
Build your Jund deck on ElderDecks
Choose the commander whose game plan you want to repeat, then start with its four-card synergy package. Fill the remaining slots with the mana, interaction, card draw and finishing tools that plan needs.
Use the free ElderDecks Commander deck builder to put the list together, then test opening hands and early sequences. Pay attention to games where your commander is removed: a resilient list should still have useful plays.
Which Jund strategy would you build first: sacrifices, lands, Dragons or creature reanimation?
Card text, color identities and legality were checked through Scryfall on November 18, 2026. Individual commander references follow; the rankings and recommendations are ElderDecks’ editorial judgments.
20 Best Jund Commanders: Black-Red-Green Decks Ranked
By ElderArticles · Updated 11/20/2026 · 23 min read
Explore the 20 best Jund commanders, ranked with black-red-green strategies, four synergy cards per pick, key rules tips, and practical deckbuilding advice.
Jund can turn a sacrificed creature into cards, a spent land into another landfall trigger, or a handful of tokens into lethal damage. The challenge is choosing which of those plans your commander should actually support.
The best Jund commanders combine black, red and green in very different ways. Korvold rewards almost any sacrifice; Henzie makes large creatures fast and disposable; Lord Windgrace rebuilds through lands. A Dragon deck, a counter deck and a graveyard engine can share these colors without wanting the same 99 cards.
Here are 20 ranked picks, each with four synergy cards, a clear reason to choose it, and a rule or limitation to keep in mind.
How we ranked the best Jund commanders
This is an editorial ranking for four-player Commander, from focused casual builds through optimized decks. It is not a cEDH tier list, a popularity chart or a claim about tournament win rates.
We prioritized consistency, recovery after disruption, and how much the commander contributes to its own strategy. Commanders that supply cards, material or mana with broadly useful support rank above options that need several narrow pieces before doing anything. A lower-ranked commander can still be the better choice for the game you want to play.
All 20 commanders and the recommended synergy cards were checked for Commander legality and color identity on November 18, 2026, using Scryfall card data and Wizards’ current banned list. These are build directions, not fixed power ratings; tutors, fast mana and compact combos can change the experience substantially.
Best for: Big creatures and straightforward combat.
Mr. Orfeo doubles a creature’s power whenever you attack, even if Orfeo stays safely out of combat. That makes him an approachable way to turn one substantial attacker into a serious threat. He ranks twentieth because he supplies neither cards nor protection: the rest of the deck must keep the attackers coming and help them connect.
Four synergy cards to start with:
Yargle and Multani starts at 18 power, giving Orfeo an enormous number to double.
Garruk's Uprising gives your creatures trample and rewards large creatures entering with card draw.
Rishkar's Expertise turns your largest creature’s power into a fresh hand after combat, while Orfeo’s boost still lasts.
Fling converts a boosted creature into direct damage when attacking alone is insufficient.
Watch for: Doubling power does not double toughness or grant trample. Fling deals noncombat damage, so it does not count toward the 21 combat damage needed for a commander-damage loss.
Best for: Creature deaths that leave an attacking army.
Sek’Kuar replaces your other dying nontoken creatures with hasty 3/1 Graveborn tokens. A sacrifice deck can therefore trade away its utility creatures without surrendering all its pressure. He earns a place for resilience and an actual combat plan, but five mana and no built-in sacrifice outlet make his setup slower than the strongest Jund engines.
Four synergy cards to start with:
Reassembling Skeleton provides a nontoken creature you can repeatedly return and sacrifice, as mana allows.
Viscera Seer lets you choose when creatures die while improving your next draw.
Zulaport Cutthroat adds life loss to deaths, including the eventual deaths of your Graveborn tokens.
Evolutionary Leap turns a disposable creature into another creature card while Sek’Kuar leaves a token behind.
Watch for: Sacrificing a Graveborn token does not create another Graveborn. Sek’Kuar specifically needs another nontoken creature you control to die.
Shattergang Brothers let you exchange one of your creatures, artifacts or enchantments for the same kind of sacrifice from each opponent. That can generate a substantial multiplayer advantage when your own permanent is expendable. The limitation is efficiency: every activation costs three mana, and opponents choose what they lose. This is an attrition commander, not precision removal.
Ichor Wellspring draws on entry and again when sacrificed to the artifact ability.
Rancor returns to your hand after you sacrifice it from the battlefield to the enchantment ability.
Awakening Zone makes a fresh creature token on each of your upkeeps for future sacrifices.
Watch for: A permanent with multiple types still pays for only one activation when sacrificed. You cannot use the same sacrifice to pay two different costs.
Best for: Turning a messy battlefield into one enormous attacker.
Kresh grows when another creature dies, regardless of who controlled it, using that creature’s power. He rewards the removal and sacrifice effects Jund already wants to play. His ceiling is spectacular, but he must accumulate counters and then find a way through blockers. Losing him to removal also loses the stored power, which keeps him below commanders that bank cards or mana.
Four synergy cards to start with:
Plaguecrafter creates multiple potential deaths while disrupting opponents.
Greater Good turns a large creature—or Kresh himself in an emergency—into cards before the investment disappears.
Temur Battle Rage gives double strike and, when its power condition is met, trample for a finishing attack.
Chandra's Ignition uses Kresh’s current power to damage opposing creatures and opponents, with subsequent deaths potentially growing him further.
Watch for: Kresh does not grow before Chandra’s Ignition deals its damage. The death triggers resolve afterward, and Kresh must survive to keep the resulting counters.
Best for: Jund Dragons and explosive combat turns.
Karrthus offers the most direct Dragon plan on this list: deploy threatening Dragons, then give the team haste. His entrance can also take every Dragon on the battlefield, a dramatic swing at the right table. Seven mana and limited card advantage make him expensive to build around, but he delivers a clear finishing turn for players who want Dragons rather than a sacrifice engine.
Four synergy cards to start with:
Lathliss, Dragon Queen adds a 5/5 Dragon token whenever another nontoken Dragon enters under your control.
Scourge of Valkas turns each incoming Dragon into damage that scales with your Dragon count.
Dragon Tempest provides earlier haste and another Dragon-entry damage payoff.
Dragonlord Atarka combines a large evasive body with removal when it enters.
Watch for: An opponent’s copy of Karrthus can steal your Dragons with its own entrance trigger. Also, gaining control of a Dragon is not the same as that Dragon entering the battlefield.
Best for: Combat-triggered aristocrats with evasive tokens.
Xira marks another creature with an egg when she attacks. When that creature later dies with an egg counter, you draw a card and receive a flying Insect. Haste lets her begin immediately, and she does not need to deal combat damage to place the egg. She ranks here because one marked creature per attack is slower than the broader death and sacrifice engines above her.
Four synergy cards to start with:
Sakura-Tribe Elder can carry an egg, then sacrifice itself for a land and Xira’s reward.
Viscera Seer lets you cash in your own marked creature at a useful moment.
Skullclamp converts the resulting 1/1 Insects into two cards apiece when they die equipped.
Best for: Group damage and unpredictable enrage pressure.
Indoraptor rewards you for damaging opponents before casting it, then turns damage dealt to it into a threat against a randomly chosen opponent. Three mana makes it easy to deploy after setup, and menace gives the growing body a combat role. Random selection and an opponent’s option to sacrifice a nontoken creature make the payoff less controllable than targeted removal or guaranteed drain.
Four synergy cards to start with:
Flame Rift damages all players; in a four-player game, an unprevented Rift deals 12 total damage to your three opponents for bloodthirst.
Marauding Raptor discounts the generic part of Indoraptor’s cost and deals damage to it on entry, triggering enrage.
Blasphemous Act can clear creatures while triggering enrage from its damage event.
Heroic Intervention can preserve Indoraptor through damage-based removal while still allowing damage to trigger enrage.
Watch for: Thirteen damage from one Blasphemous Act produces one enrage trigger, not thirteen. Indoraptor’s triggered damage is not commander combat damage, and you do not choose the opponent.
Best for: Permanent-heavy decks and top-of-library manipulation.
Whenever Vaevictis attacks, you choose a permanent for every player to sacrifice, including yourself. Those players then reveal their top card and put it onto the battlefield if it is a permanent. You can turn a token into a major threat while removing opposing problem cards. The six-mana commander must attack to begin, and opponents can reveal excellent replacements, so the deck needs deliberate setup.
Four synergy cards to start with:
Sensei's Divining Top helps arrange a useful permanent on top before the attack trigger resolves.
Scroll Rack can put an expensive permanent from your hand on top of your library.
Awakening Zone supplies a token you can exchange rather than sacrificing a valuable permanent.
It That Betrays adds a second payoff when opponents sacrifice nontoken permanents.
Watch for: You do not get to choose what opponents reveal. An instant or sorcery revealed this way stays on top; Vaevictis does not automatically mill it.
Best for: Group slug and pressure on opponents’ mana use.
Yurlok makes losing unspent mana cost life and can give every player black, red and green mana. That creates unusual timing decisions, but it also hands your opponents real resources. He belongs in a deck that pressures life totals and understands when opponents can spend the mana. His distinctive game plan ranks well for identity, while the symmetrical assistance limits his consistency.
Four synergy cards to start with:
Citadel of Pain punishes leaving lands untapped at the beginning of an end step, while Yurlok makes simply floating the mana risky.
Manabarbs adds a life cost to tapping lands for mana.
Havoc Festival accelerates the life-total pressure and prevents lifegain from undoing it.
Rhythm of the Wild can give Yurlok haste so his mana ability is available immediately.
Watch for: Receiving mana does not immediately cause life loss. Players lose life only when they actually lose unspent mana, and they can spend the gift on spells or abilities when timing allows.
Disa turns Lhurgoyf permanent cards entering your graveyard from somewhere other than the battlefield into creatures on the battlefield. She also makes Tarmogoyf tokens when your creatures deal combat damage to players. That combines graveyard development with combat pressure. She sits outside the top ten because the first ability needs a focused card pool or a type-changing support piece, and she costs five mana.
Four synergy cards to start with:
Buried Alive can put three suitable creature cards into your graveyard and trigger Disa for each Lhurgoyf.
Maskwood Nexus makes your creature cards outside the battlefield every creature type, greatly expanding Disa’s options.
Tortured Existence lets you discard a Lhurgoyf while returning another creature card to your hand.
Pyrogoyf turns your Lhurgoyfs entering into damage as well as board presence.
Watch for: A Lhurgoyf dying from the battlefield does not trigger Disa’s first ability. Her combat trigger is once per player damaged in that combat-damage event, not once per creature connecting.
Best for: Lands value with an attacking commander.
Soul of Windgrace retrieves a land from any graveyard when it enters or attacks. It can also discard lands for life, cards or temporary indestructibility. This makes a flexible midrange commander: you get value on arrival, have a reason to attack, and can use spare lands productively. It ranks below Lord Windgrace because repeated land recovery is more dependent on combat or additional support.
Four synergy cards to start with:
Life from the Loam refills your hand with lands to replay or discard to Soul’s abilities.
Entish Restoration puts a land in the graveyard while ramping; Soul’s five power meets its larger-search condition if Soul remains on the battlefield.
Ramunap Excavator lets you play lands from your graveyard alongside Soul’s triggered recovery.
World Shaper stocks the graveyard through attacks and returns your land cards when it dies.
Watch for: Soul puts the recovered land onto the battlefield tapped. Its indestructibility ability taps Soul, but tapping is an effect rather than a cost, so you can activate it even when Soul is already tapped.
Best for: Harmful gifts and graveyard-based disruption.
The Bullies give a nonlegendary creature from your graveyard to the opponent whose turn it is. Haste, goad and delayed exile make ordinary gifts temporary attackers; creatures with disastrous entrance abilities turn the same ability into a much sharper weapon. The ceiling is high, but the deck can draw awkward payloads and attract immediate attention. Its narrow setup keeps it below more broadly useful engines.
Four synergy cards to start with:
Entomb finds the exact creature you want to give away.
Buried Alive stocks several possible gifts so you can adapt to the table.
Leveler exiles its new controller’s library when it enters.
Eater of Days makes its new controller skip their next two turns.
Watch for: You cannot activate the ability on your own turn because it needs an opponent whose turn it is. Gifts must be nonlegendary. Leveler does not cause an immediate loss merely by emptying a library; a player normally loses when they try to draw from an empty one.
Best for: Minus-one counters, card draw and attrition.
Auntie Ool draws cards when one or more -1/-1 counters are put on a creature you control and makes an opposing creature’s controller lose life when counters are put on their creature. This turns both self-inflicted counters and removal into resources. Four mana and an engine that does not require combat earn a high ranking, although the deck needs specialized counter sources and must manage its own shrinking creatures.
Nest of Scarabs creates Insects according to the number of -1/-1 counters you place.
Black Sun's Zenith spreads counters across the battlefield, potentially generating multiple Ool triggers while acting as a sweeper.
Devoted Druid puts a counter on itself to untap, supplying mana and a card-draw trigger while its toughness permits.
Watch for: Ool triggers once for each creature receiving one or more counters in an event, not once per individual counter. A large Zenith can also kill Ool and your own board; plan the recovery.
Best for: Large creatures, sacrifice damage and Treasure.
Ziatora turns another creature into damage and three Treasures at the beginning of your end step. That links a finishing plan to the resources for your next play: deploy a threat, use it if possible, then convert it into damage and mana. She costs six, but can deliver value on the turn she enters without attacking. Her once-per-end-step timing is the main constraint.
Four synergy cards to start with:
Yargle and Multani provides 18 power for a particularly threatening sacrifice.
Malignus scales its power with the highest opposing life total, creating another large damage payload.
Stalking Vengeance adds a separate damage trigger when another creature you control dies.
Reanimate returns a large creature from a graveyard so you can use it again, at a life cost.
Watch for: Ziatora, rather than the sacrificed creature, deals the damage from her ability. Malignus’s own damage-prevention restriction therefore does not make Ziatora’s damage unpreventable. You also cannot sacrifice several creatures to one end-step trigger.
Best for: Resilient reanimation with reusable support creatures.
Slimefoot and Squee create a Saproling when they enter or attack. From the graveyard, their activated ability can sacrifice a Saproling to bring them back alongside another creature. That supplies an engine you can rebuild without repeatedly casting the commander. Three mana to deploy and flexible creature targets give the deck a strong foundation, although graveyard hate and losing every Saproling can interrupt it.
Spore Frog is a reusable defensive reanimation target against combat decks.
Eternal Witness turns repeated returns into recovery of your most useful cards.
Victimize uses a spare token to return two creature cards and helps rebuild after removal.
Watch for: To activate their return ability, Slimefoot and Squee must be in your graveyard. Choosing the command zone instead removes that option. The ability is sorcery-speed, so this is not an instant-speed Spore Frog loop on every opponent’s turn.
Best for: Lands, graveyard recovery and durable midrange.
Lord Windgrace combines card selection with land recursion in the command zone. Discarding a land to his +2 draws an extra card, while his -3 returns up to two lands directly to the battlefield. That lets the deck treat lands as reusable resources rather than dead late-game draws. He ranks highly for recovery and flexibility, though a planeswalker commander needs creatures or interaction to discourage attacks.
Four synergy cards to start with:
Life from the Loam replenishes land cards to discard and can stock the graveyard through dredge.
Splendid Reclamation returns a large graveyard of lands after you have developed the setup.
Field of the Dead converts land entries into Zombies once you control seven lands with different names.
Titania, Protector of Argoth recovers a land on entry and adds Elementals when your lands go to the graveyard from the battlefield.
Watch for: Returning lands with Windgrace’s -3 is not the same as playing lands, so it does not use your normal land play. He is commander-eligible because his text explicitly says so; this does not make every planeswalker a legal commander.
Best for: Tokens, sacrifice and optional combo finishes.
Prossh supplies both material and a sacrifice outlet. Casting him creates Kobolds according to the mana spent, and he can sacrifice other creatures to increase his power. That is a remarkably complete package: the tokens can draw cards, fuel other effects or become an army. Six mana is substantial, but the cast trigger and multiple finishing routes make Prossh one of Jund’s most dependable build-arounds.
Four synergy cards to start with:
Skullclamp turns the 0/1 Kobolds into cards when they die equipped.
Beastmaster Ascension makes attacking with a large token group a credible combat finish.
Food Chain supports repeated commander-casting combo lines by converting creatures into mana restricted to creature spells.
Watch for: Prossh creates tokens when cast, not when reanimated or blinked. Food Chain exiles creatures rather than sacrificing them, so it does not trigger ordinary death or sacrifice payoffs. Choose the combo route to match your table.
Hearthhull, the Worldseed | Illustration by Daniel Ljunggren
Best for: Land sacrifice, extra land plays and card advantage.
Hearthhull provides an unusually efficient lands engine. At two charge counters, it can tap, spend one mana and sacrifice a land to draw two cards and allow an extra land play that turn. At eight counters, its final section also turns land sacrifices into life loss for each opponent. Card advantage, acceleration and a finishing payoff in one four-mana commander earn it third place; the station setup and land recovery still need support.
Four synergy cards to start with:
Ramunap Excavator lets you use the extra land play to replay a sacrificed land.
Titania, Protector of Argoth turns sacrificed lands into 5/3 Elementals that can also contribute power to station.
Aftermath Analyst mills on entry and can return the accumulated land cards from your graveyard.
Splendid Reclamation provides another mass land-recovery spell after several sacrifices.
Watch for: The life-loss ability belongs to the eight-counter section; it is not active immediately. Station is sorcery-speed. Hearthhull is commander-eligible under the rule for legendary Spacecraft with printed power and toughness.
Best for: Creature value, blitz and aggressive reanimation.
Henzie gives your creature spells with mana value four or greater blitz, then discounts blitz costs for each time you have cast your commander from the command zone. The resulting creatures arrive with haste and replace themselves when they die. This makes a cohesive deck from creatures that already have useful entrance, attack or death abilities. Henzie takes second because his three-mana engine makes an ordinary sequence of creatures productive without needing a narrow combo.
Four synergy cards to start with:
Solemn Simulacrum ramps on entry, then supplies both its own death draw and the blitz death draw.
Junji, the Midnight Sky adds a powerful death choice, including returning a non-Dragon creature from a graveyard.
Woodfall Primus destroys a noncreature permanent on entry and can return through persist after its first death.
Greater Good lets you sacrifice a blitzed threat for power-based card draw before the scheduled end-step sacrifice.
Watch for: Blitz discounts reduce generic mana, not colored requirements. Reanimating a creature does not give it blitz. A creature exiled instead of dying also does not provide the blitz death draw.
Best for: Broad sacrifice engines with the strongest card-advantage foundation.
Korvold rewards every permanent you sacrifice with a card and a +1/+1 counter. Creatures, Treasures, fetch lands and other expendable permanents all become useful fuel, while his flying body grows into a closing threat. He takes first because so many individually playable cards naturally advance the engine. The drawback is visibility: an unchecked Korvold can snowball rapidly, so expect removal and build enough ramp and draw to function without him.
Four synergy cards to start with:
Sakura-Tribe Elder becomes ramp, a card and a counter when sacrificed with Korvold on the battlefield.
Pitiless Plunderer turns other creature deaths into Treasures, creating another permanent to sacrifice later.
Mayhem Devil adds targeted damage to sacrifices, including those made by opponents.
Chatterfang, Squirrel General adds Squirrels to your token production and offers a way to sacrifice them for creature interaction.
Watch for: Korvold rewards sacrificing any permanent, but does not let you sacrifice arbitrary permanents whenever you want. You still need an outlet or a cost that instructs you to sacrifice. Destroying or discarding a card is not sacrificing it.
How to build a Jund Commander deck that works
Pick one main engine. A sacrifice deck needs expendable permanents, sacrifice outlets and payoffs. A lands deck needs land recovery and ways to benefit from repeated land entries or sacrifices. A Dragon deck needs enough early mana and card draw to reach its threats. Begin with the commander’s plan before adding every appealing Jund card you own.
Make the first four turns productive. As a starting point, consider 36–38 lands and roughly 8–12 ramp sources, then adjust for your curve and land strategy. Ignoble Hierarch fixes all three Jund colors, Sakura-Tribe Elder ramps while serving sacrifice plans, and Nature’s Lore finds a Forest card. Prioritize access to the colors needed for your early spells, not just a high total land count.
Separate drawing cards from spending them. A hand full of sacrifice payoffs does little without material, and a hand full of giant creatures needs a way to cast them. Include card advantage that works while your commander is absent. Look for cards that fill two useful roles, such as Solemn Simulacrum providing ramp and a death payoff.
Keep interaction that fits the table.Beast Within answers a broad range of permanents, while Rakdos Charm offers graveyard interaction, artifact removal or a way to punish a large creature army. Add sufficient creature removal and board wipes alongside the engine. A deck that only develops its own board can lose to a faster plan it never tries to disrupt.
Choose a real finish. Korvold can combine sacrifice damage with an enormous flying attacker. Henzie can keep delivering hasty threats. Windgrace can build an army from land payoffs. Decide how your deck ends a game rather than assuming that accumulating value will eventually be enough.
Jund is black, red and green. A Jund commander permits cards whose color identities fit within those three colors, including colorless cards. A card’s color identity can include colored mana symbols in its rules text, not just its casting cost. Hybrid symbols contribute both of their colors; Indoraptor’s black-green hybrid symbol helps give it a full Jund identity.
Which Jund commander should a beginner choose?
Mr. Orfeo is an approachable choice for learning combat, trample and power-based payoffs. Henzie is a strong next step for players who enjoy creatures entering, attacking and dying for value. Start with a coherent creature package and limited moving parts; you do not need to include every combo the colors support.
Is Korvold always the strongest choice?
Korvold is our top overall pick because his card advantage fits so many useful sacrifice effects. That does not make him the best leader for every Jund deck. Karrthus supports a dedicated Dragon plan more directly, while Auntie Ool rewards a counter strategy that Korvold does not specifically enable.
Yes. Lord Windgrace explicitly has permission in its rules text. Hearthhull qualifies under the Commander rule allowing legendary Vehicles and Spacecraft with printed power and toughness. Neither permission means every artifact or planeswalker can lead a Commander deck.
Build your Jund deck on ElderDecks
Choose the commander whose game plan you want to repeat, then start with its four-card synergy package. Fill the remaining slots with the mana, interaction, card draw and finishing tools that plan needs.
Use the free ElderDecks Commander deck builder to put the list together, then test opening hands and early sequences. Pay attention to games where your commander is removed: a resilient list should still have useful plays.
Which Jund strategy would you build first: sacrifices, lands, Dragons or creature reanimation?
Card text, color identities and legality were checked through Scryfall on November 18, 2026. Individual commander references follow; the rankings and recommendations are ElderDecks’ editorial judgments.