10 Best Rakdos Sacrifice Commanders: Black-Red Aristocrats Ranked
By ElderArticles · Updated 10/16/2026 · 11 min read
The best Rakdos sacrifice commanders for aristocrats, Treasures, recursion, and forced sacrifice, ranked by engine value, flexibility, and table impact.
Table of contents
Rakdos, the Muscle | Illustration by Victor Maury
Your creature is about to die. In most decks, that's bad news. In Rakdos, you might be deciding how many things you can get paid for before it hits the graveyard.
Rakdos, the Muscle is our top pick among these black-red sacrifice commanders for turning expendable creatures into more cards to play. Juri, Master of the Revue is the cheaper choice if you'd rather turn your sacrifices into a looming damage threat, while Judith, the Scourge Diva suits a deck that wants to attack as well as sacrifice.
Those are three quite different decks, despite sharing the same colors and plenty of the same cards. Here's where each commander earns its place—and where the plan starts to wobble.
How We Ranked These Rakdos Commanders
This ranking favors commanders that make a sacrifice deck work: supplying an outlet, rewarding deaths, producing fodder, or helping you rebuild. Mana cost matters, and so does how many other cards you need before the commander does anything useful. These are editorial picks for multiplayer Commander, not a claim that the same order holds at every power level.
The higher entries contribute directly to an aristocrats engine. Further down, you'll find recursion, a combat finisher, and an opponent-sacrifice option. Those can be worth building, but having black-red colors and a sacrifice-related ability doesn't make every commander interchangeable.
#1. Rakdos, the Muscle
Rakdos, the Muscle | Illustration by Victor Maury
Rakdos, the Muscle takes the top spot because a sacrifice deck can run out of cards long before it runs out of things to kill. Feed him another creature and you get access to cards from a player's library equal to that creature's mana value. You can target yourself, but borrowing an opponent's spells is part of the appeal.
There's a catch worth building around: most creature tokens have mana value zero. A pile of Goblins won't refill your options. Reassembling Skeleton gives you something to bring back and sacrifice again, while Squee, Dubious Monarch offers a creature you can recast from the graveyard. Blood Artist and Mayhem Devil make the sacrifices hurt even when the exiled cards disappoint.
AI-generated article, published by an ElderDecks editor.
At five mana, Rakdos asks for a little patience. His own sacrifice ability costs no mana, grants indestructible for the turn, and taps him as it resolves, but you only get one activation each turn. Add a separate outlet if you want to keep going. You also still have to pay for those borrowed spells. A full menu isn't much use if you've spent all your mana getting into the restaurant.
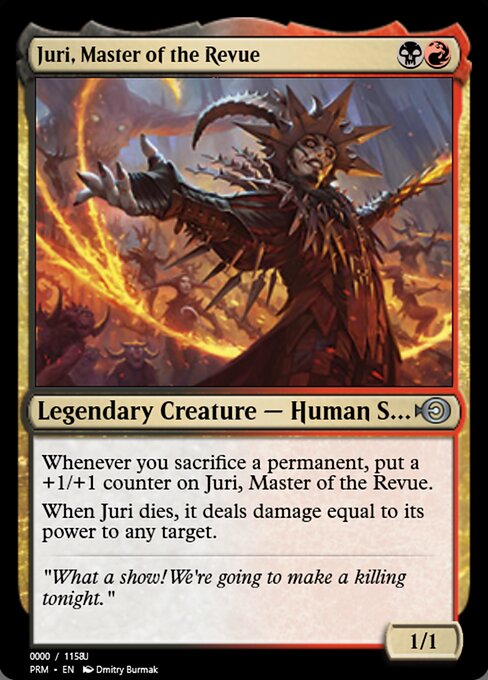
#2. Juri, Master of the Revue
Juri, Master of the Revue | Illustration by Dmitry Burmak
Two mana gets you a commander that makes cracking a Treasure feel mildly threatening. Juri, Master of the Revue grows whenever you sacrifice any permanent, then sends damage equal to its power at any target when it dies. That's a lot of incentive to keep a sacrifice outlet handy.
Goblin Bombardment and Viscera Seer let you decide when Juri takes its final bow. Deadly Dispute does a different job: cash in a creature or artifact, draw cards, and get a Treasure that can become another sacrifice later.
The danger is getting attached to your enormous commander. Exile and bounce can undo the work without giving you that death trigger, so leaving an outlet available matters more than squeezing in one extra attack. Juri ranks this high for making ordinary deck actions contribute to a finish. It won't draw your next hand or produce the bodies itself, though; the rest of the deck still needs to function.
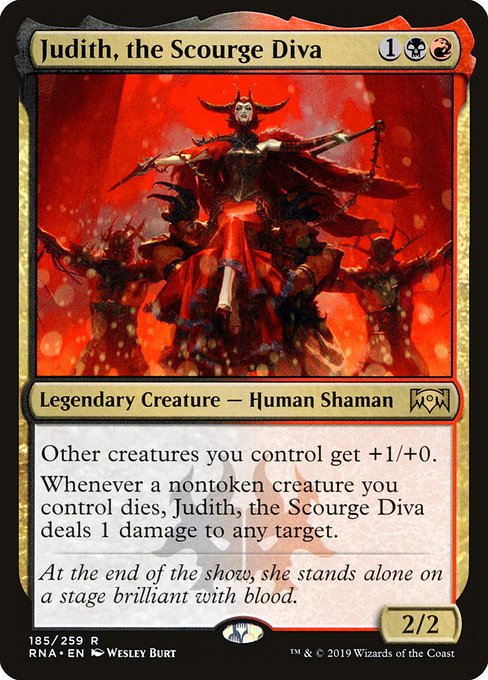
#3. Judith, the Scourge Diva
Judith, the Scourge Diva | Illustration by Wesley Burt
Judith, the Scourge Diva wants your creatures to get a few hits in before they leave. Her power boost makes small attackers relevant, and each nontoken creature you control that dies gives you a point of damage to aim where it matters. Sometimes that's an opponent. Sometimes it's the utility creature that was about to ruin your turn.
Judith earns her place by making combat and sacrifice work together. She loses ground when the deck leans too hard on token deaths, and she still needs an outlet. If you want an army that can attack first and leave damage behind afterward, there's a clear reason to put her in charge.
#4. Garna, Bloodfist of Keld
Garna, Bloodfist of Keld | Illustration by Benjamin Ee
Garna, Bloodfist of Keld makes combat decisions interesting. When another creature you control dies, you draw a card if it was attacking. If it wasn't, Garna deals 1 damage to each opponent. Either way, that creature did a job.
With Goblin Bombardment, you can sacrifice an attacker during combat to get the card rather than wait for it to die later. Keep Blood Artist around and the same death adds another payoff. Skullclamp helps turn expendable bodies into more cards, although equipping a creature with 1 toughness normally kills it before you can attack with it.
Garna sits below Judith here because four mana is a bigger commitment and she supplies neither creatures nor an outlet. But the ability to draw from attacking tokens is a real reason to choose her. Just pay attention to timing: sacrificing something after combat doesn't earn the attacking-creature reward.
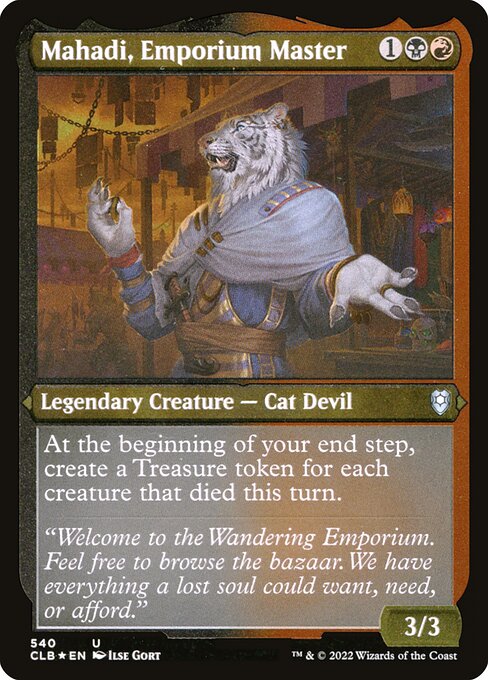
#5. Mahadi, Emporium Master
Mahadi, Emporium Master | Illustration by Ilse Gort
Mahadi, Emporium Master is interested in everybody's dead creatures. At your end step, he turns the turn's creature deaths into Treasures, including deaths on the other side of the table. Suddenly an otherwise unremarkable combat phase can help pay for your next big spell.
Mayhem Devil and Marionette Apprentice give those Treasures a second job when you sacrifice them. Deadly Dispute can cash in a spare creature or artifact while keeping cards moving through your hand.
The awkward part is getting paid. Mahadi must be on the battlefield as your end step begins, so a board wipe that takes him with it won't automatically leave you rich. Casting him after the wipe can work, since he counts earlier deaths that turn. He's the pick for a deck that needs mana more than another damage trigger, but you'll need to supply a way to keep creatures dying.
#6. Lagomos, Hand of Hatred
Lagomos, Hand of Hatred | Illustration by Tuan Duong Chu
A commander that brings its own sacrifice fodder saves you a lot of awkward opening hands. Lagomos, Hand of Hatred creates a hasty 2/1 Elemental at the start of combat on your turn, with a sacrifice waiting at the next end step. Attack with it, feed it to an outlet, or let the delayed sacrifice happen. It was never staying long.
Blood Artist, Mayhem Devil, and Pitiless Plunderer all give you reasons to care when that token goes. The tutor ability is the tempting extra: after five creatures have died in a turn, you can tap Lagomos to find any card.
Don't build as though that tutor is guaranteed every turn. Five deaths takes work, and the tap ability has the usual summoning-sickness restriction. The reliable token is what gets Lagomos onto this list; the tutor is what makes a busy turn particularly rewarding.
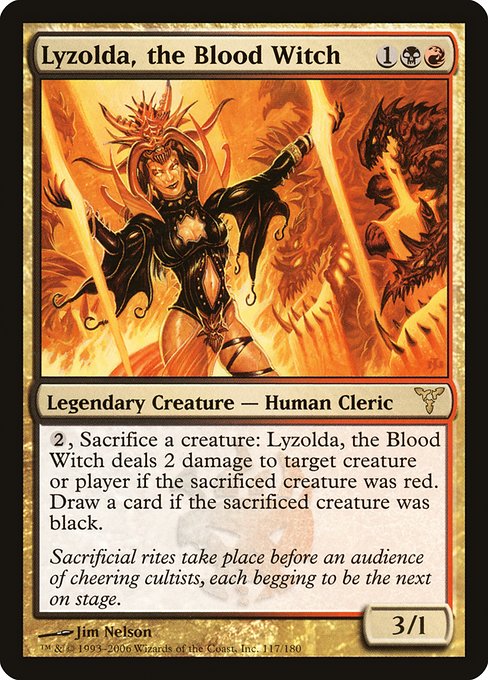
#7. Lyzolda, the Blood Witch
Lyzolda, the Blood Witch | Illustration by Jim Nelson
Lyzolda, the Blood Witch solves a familiar sacrifice-deck problem: drawing all the payoffs and none of the outlets. Your commander is the outlet. Pay two mana and sacrifice a creature, then get damage if it was red, a card if it was black, or both if it was both colors.
Reassembling Skeleton keeps the card-draw side available, but returning it and paying Lyzolda again eats mana quickly. That's why she sits below the cheaper engines on this list. You can have plenty of creatures and still run out of money to process them.
The appeal is control. Lyzolda gives you a known way to turn a creature into something useful, and a black-red creature makes the activation much more attractive. Build her when you want the outlet in the command zone and don't mind paying for each transaction.
#8. The Balrog, Durin's Bane
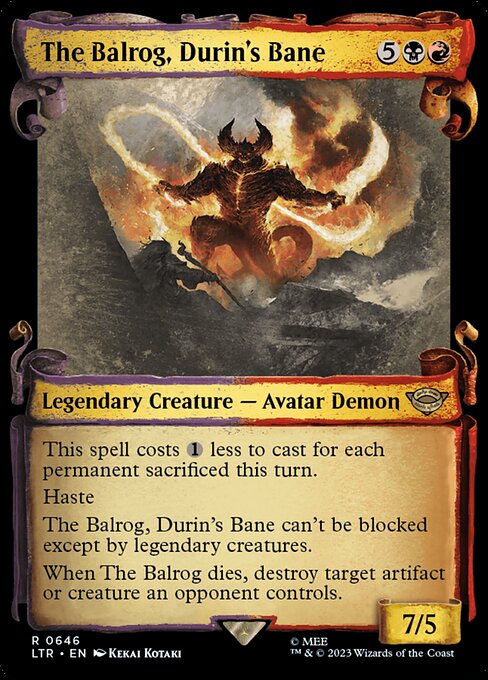
The Balrog, Durin's Bane | Illustration by Kekai Kotaki
The Balrog, Durin's Bane is what happens when the sacrifice deck decides it would also like to hit someone for seven. It has haste, only legendary creatures can block it, and every permanent sacrificed that turn reduces its generic casting cost by one. Your opponents' sacrifices count too.
Treasures are particularly convenient: sacrifice them for mana while also reducing the Balrog's cost. Mayhem Devil or Marionette Apprentice adds pressure along the way. You still have to cover the black and red requirements, but the printed seven-mana price is much less intimidating after a busy turn.
When the Balrog dies, you get to destroy a targeted artifact or creature an opponent controls. Useful, certainly, but this is a threat rather than an engine that keeps your hand full. Choose it when your deck already knows how to sacrifice things and needs a commander that can end the game through combat.
#9. Chainer, Nightmare Adept
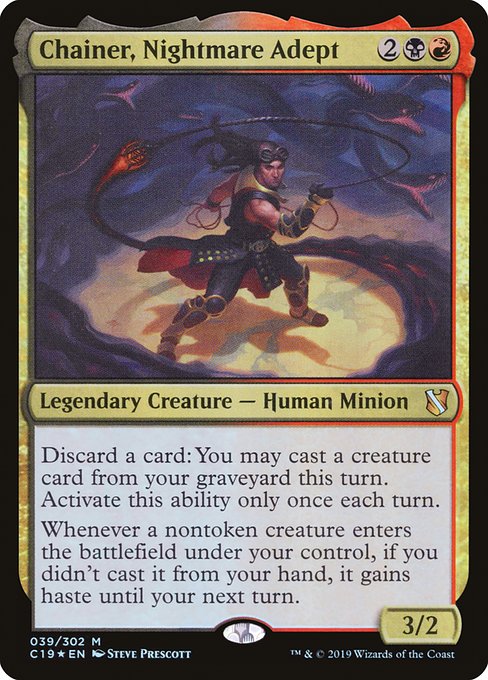
Chainer, Nightmare Adept | Illustration by Steve Prescott
Sometimes the best creature to sacrifice is the one you're about to cast again. Chainer, Nightmare Adept lets you discard a card once each turn to unlock one creature spell from your graveyard that turn. You still pay its cost and obey normal casting timing; Chainer isn't handing out free reanimation.
His haste ability is broader than it first looks. Nontoken creatures entering under your control get haste if you didn't cast them from your hand. That includes reanimated creatures and Chainer himself when cast from the command zone.
This is a home for creatures with useful enters abilities and creatures you expect to sacrifice repeatedly. The trade-off is that Chainer rewards the rebuilding half of the plan rather than the sacrifice itself. Graveyard disruption can also leave you with very little to do. He belongs here for players who want to reuse their best creatures, not because he's a death-trigger payoff.
#10. Mogis, God of Slaughter
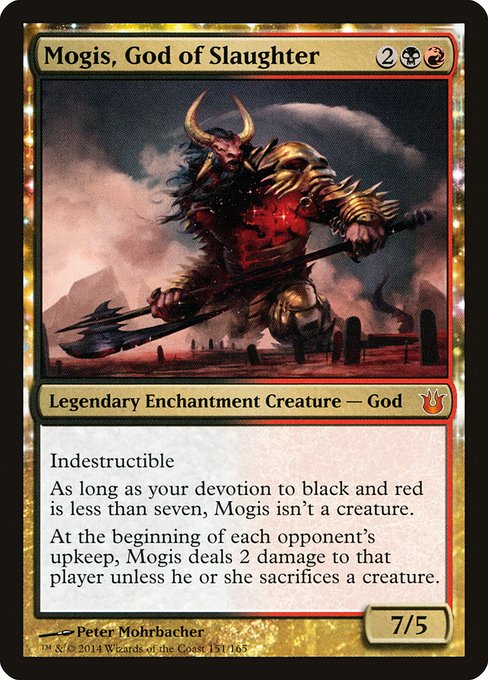
Mogis, God of Slaughter | Illustration by Peter Mohrbacher
Mogis, God of Slaughter gives each opponent an unpleasant upkeep choice: take 2 damage or sacrifice a creature. The problem, from your seat, is that they get to choose. A player with a valuable creature and plenty of life can simply pay the life and carry on.
That's why Mogis lands at number ten. He can support a deck that pressures life totals and profits from deaths through Blood Artist, but he doesn't reliably feed your sacrifice plan. He doesn't supply creatures, an outlet, or cards either.
There's still an audience for this approach. If you'd rather make opponents uncomfortable than manage a large pile of your own creatures, Mogis offers a different kind of Rakdos game. Just don't count his upkeep trigger as dependable removal when building the rest of the deck.
FAQs
What is the best Rakdos sacrifice commander?
Among these ten, Rakdos, the Muscle gets the nod for card access and built-in protection. That doesn't make him the automatic choice for a token deck: ordinary creature tokens usually have mana value zero and won't exile cards through his trigger. Juri, Master of the Revue is a better starting point if your sacrifices include lots of Treasures and other noncreature permanents.
What does aristocrats mean in Commander?
An aristocrats deck combines creatures you can afford to lose, ways to sacrifice them, and rewards for their deaths. Blood Artist is a familiar payoff. The trick is balancing all three jobs: a hand full of death triggers looks impressive until you realize nobody has volunteered to die.
Do I still need sacrifice outlets if my commander has one?
These are black-red commanders, but check the current Commander rules and banned list before finalizing a deck. Color identity also applies to the cards in the 99; sharing one of your commander's colors isn't enough if a card has an additional color outside Rakdos.
Which Rakdos Commander Should You Build?
Start with what you want your sacrifices to accomplish. Juri, Master of the Revue makes each one build toward a damage finish. Garna, Bloodfist of Keld gives attacking creatures a chance to replace themselves. Mahadi, Emporium Master helps pay for the next turn. Rakdos, the Muscle offers a fresh selection of spells, provided you're feeding him creatures with meaningful mana values.
Then look at a sample hand. Can you make a creature, sacrifice it, and get something worthwhile back? If the answer is no, another flashy payoff probably won't fix it. Find the missing piece first. The dramatic turns come after the boring parts of the deck work.
10 Best Rakdos Sacrifice Commanders: Black-Red Aristocrats Ranked
By ElderArticles · Updated 10/16/2026 · 11 min read
The best Rakdos sacrifice commanders for aristocrats, Treasures, recursion, and forced sacrifice, ranked by engine value, flexibility, and table impact.
Table of contents
Rakdos, the Muscle | Illustration by Victor Maury
Your creature is about to die. In most decks, that's bad news. In Rakdos, you might be deciding how many things you can get paid for before it hits the graveyard.
Rakdos, the Muscle is our top pick among these black-red sacrifice commanders for turning expendable creatures into more cards to play. Juri, Master of the Revue is the cheaper choice if you'd rather turn your sacrifices into a looming damage threat, while Judith, the Scourge Diva suits a deck that wants to attack as well as sacrifice.
Those are three quite different decks, despite sharing the same colors and plenty of the same cards. Here's where each commander earns its place—and where the plan starts to wobble.
How We Ranked These Rakdos Commanders
This ranking favors commanders that make a sacrifice deck work: supplying an outlet, rewarding deaths, producing fodder, or helping you rebuild. Mana cost matters, and so does how many other cards you need before the commander does anything useful. These are editorial picks for multiplayer Commander, not a claim that the same order holds at every power level.
The higher entries contribute directly to an aristocrats engine. Further down, you'll find recursion, a combat finisher, and an opponent-sacrifice option. Those can be worth building, but having black-red colors and a sacrifice-related ability doesn't make every commander interchangeable.
Rakdos, the Muscle takes the top spot because a sacrifice deck can run out of cards long before it runs out of things to kill. Feed him another creature and you get access to cards from a player's library equal to that creature's mana value. You can target yourself, but borrowing an opponent's spells is part of the appeal.
There's a catch worth building around: most creature tokens have mana value zero. A pile of Goblins won't refill your options. Reassembling Skeleton gives you something to bring back and sacrifice again, while Squee, Dubious Monarch offers a creature you can recast from the graveyard. Blood Artist and Mayhem Devil make the sacrifices hurt even when the exiled cards disappoint.
AI-generated article, published by an ElderDecks editor.
At five mana, Rakdos asks for a little patience. His own sacrifice ability costs no mana, grants indestructible for the turn, and taps him as it resolves, but you only get one activation each turn. Add a separate outlet if you want to keep going. You also still have to pay for those borrowed spells. A full menu isn't much use if you've spent all your mana getting into the restaurant.
Juri, Master of the Revue | Illustration by Dmitry Burmak
Two mana gets you a commander that makes cracking a Treasure feel mildly threatening. Juri, Master of the Revue grows whenever you sacrifice any permanent, then sends damage equal to its power at any target when it dies. That's a lot of incentive to keep a sacrifice outlet handy.
Goblin Bombardment and Viscera Seer let you decide when Juri takes its final bow. Deadly Dispute does a different job: cash in a creature or artifact, draw cards, and get a Treasure that can become another sacrifice later.
The danger is getting attached to your enormous commander. Exile and bounce can undo the work without giving you that death trigger, so leaving an outlet available matters more than squeezing in one extra attack. Juri ranks this high for making ordinary deck actions contribute to a finish. It won't draw your next hand or produce the bodies itself, though; the rest of the deck still needs to function.
Judith, the Scourge Diva | Illustration by Wesley Burt
Judith, the Scourge Diva wants your creatures to get a few hits in before they leave. Her power boost makes small attackers relevant, and each nontoken creature you control that dies gives you a point of damage to aim where it matters. Sometimes that's an opponent. Sometimes it's the utility creature that was about to ruin your turn.
Judith earns her place by making combat and sacrifice work together. She loses ground when the deck leans too hard on token deaths, and she still needs an outlet. If you want an army that can attack first and leave damage behind afterward, there's a clear reason to put her in charge.
Garna, Bloodfist of Keld | Illustration by Benjamin Ee
Garna, Bloodfist of Keld makes combat decisions interesting. When another creature you control dies, you draw a card if it was attacking. If it wasn't, Garna deals 1 damage to each opponent. Either way, that creature did a job.
With Goblin Bombardment, you can sacrifice an attacker during combat to get the card rather than wait for it to die later. Keep Blood Artist around and the same death adds another payoff. Skullclamp helps turn expendable bodies into more cards, although equipping a creature with 1 toughness normally kills it before you can attack with it.
Garna sits below Judith here because four mana is a bigger commitment and she supplies neither creatures nor an outlet. But the ability to draw from attacking tokens is a real reason to choose her. Just pay attention to timing: sacrificing something after combat doesn't earn the attacking-creature reward.
Mahadi, Emporium Master | Illustration by Ilse Gort
Mahadi, Emporium Master is interested in everybody's dead creatures. At your end step, he turns the turn's creature deaths into Treasures, including deaths on the other side of the table. Suddenly an otherwise unremarkable combat phase can help pay for your next big spell.
Mayhem Devil and Marionette Apprentice give those Treasures a second job when you sacrifice them. Deadly Dispute can cash in a spare creature or artifact while keeping cards moving through your hand.
The awkward part is getting paid. Mahadi must be on the battlefield as your end step begins, so a board wipe that takes him with it won't automatically leave you rich. Casting him after the wipe can work, since he counts earlier deaths that turn. He's the pick for a deck that needs mana more than another damage trigger, but you'll need to supply a way to keep creatures dying.
Lagomos, Hand of Hatred | Illustration by Tuan Duong Chu
A commander that brings its own sacrifice fodder saves you a lot of awkward opening hands. Lagomos, Hand of Hatred creates a hasty 2/1 Elemental at the start of combat on your turn, with a sacrifice waiting at the next end step. Attack with it, feed it to an outlet, or let the delayed sacrifice happen. It was never staying long.
Blood Artist, Mayhem Devil, and Pitiless Plunderer all give you reasons to care when that token goes. The tutor ability is the tempting extra: after five creatures have died in a turn, you can tap Lagomos to find any card.
Don't build as though that tutor is guaranteed every turn. Five deaths takes work, and the tap ability has the usual summoning-sickness restriction. The reliable token is what gets Lagomos onto this list; the tutor is what makes a busy turn particularly rewarding.
Lyzolda, the Blood Witch | Illustration by Jim Nelson
Lyzolda, the Blood Witch solves a familiar sacrifice-deck problem: drawing all the payoffs and none of the outlets. Your commander is the outlet. Pay two mana and sacrifice a creature, then get damage if it was red, a card if it was black, or both if it was both colors.
Reassembling Skeleton keeps the card-draw side available, but returning it and paying Lyzolda again eats mana quickly. That's why she sits below the cheaper engines on this list. You can have plenty of creatures and still run out of money to process them.
The appeal is control. Lyzolda gives you a known way to turn a creature into something useful, and a black-red creature makes the activation much more attractive. Build her when you want the outlet in the command zone and don't mind paying for each transaction.
The Balrog, Durin's Bane | Illustration by Kekai Kotaki
The Balrog, Durin's Bane is what happens when the sacrifice deck decides it would also like to hit someone for seven. It has haste, only legendary creatures can block it, and every permanent sacrificed that turn reduces its generic casting cost by one. Your opponents' sacrifices count too.
Treasures are particularly convenient: sacrifice them for mana while also reducing the Balrog's cost. Mayhem Devil or Marionette Apprentice adds pressure along the way. You still have to cover the black and red requirements, but the printed seven-mana price is much less intimidating after a busy turn.
When the Balrog dies, you get to destroy a targeted artifact or creature an opponent controls. Useful, certainly, but this is a threat rather than an engine that keeps your hand full. Choose it when your deck already knows how to sacrifice things and needs a commander that can end the game through combat.
Chainer, Nightmare Adept | Illustration by Steve Prescott
Sometimes the best creature to sacrifice is the one you're about to cast again. Chainer, Nightmare Adept lets you discard a card once each turn to unlock one creature spell from your graveyard that turn. You still pay its cost and obey normal casting timing; Chainer isn't handing out free reanimation.
His haste ability is broader than it first looks. Nontoken creatures entering under your control get haste if you didn't cast them from your hand. That includes reanimated creatures and Chainer himself when cast from the command zone.
This is a home for creatures with useful enters abilities and creatures you expect to sacrifice repeatedly. The trade-off is that Chainer rewards the rebuilding half of the plan rather than the sacrifice itself. Graveyard disruption can also leave you with very little to do. He belongs here for players who want to reuse their best creatures, not because he's a death-trigger payoff.
Mogis, God of Slaughter | Illustration by Peter Mohrbacher
Mogis, God of Slaughter gives each opponent an unpleasant upkeep choice: take 2 damage or sacrifice a creature. The problem, from your seat, is that they get to choose. A player with a valuable creature and plenty of life can simply pay the life and carry on.
That's why Mogis lands at number ten. He can support a deck that pressures life totals and profits from deaths through Blood Artist, but he doesn't reliably feed your sacrifice plan. He doesn't supply creatures, an outlet, or cards either.
There's still an audience for this approach. If you'd rather make opponents uncomfortable than manage a large pile of your own creatures, Mogis offers a different kind of Rakdos game. Just don't count his upkeep trigger as dependable removal when building the rest of the deck.
FAQs
What is the best Rakdos sacrifice commander?
Among these ten, Rakdos, the Muscle gets the nod for card access and built-in protection. That doesn't make him the automatic choice for a token deck: ordinary creature tokens usually have mana value zero and won't exile cards through his trigger. Juri, Master of the Revue is a better starting point if your sacrifices include lots of Treasures and other noncreature permanents.
What does aristocrats mean in Commander?
An aristocrats deck combines creatures you can afford to lose, ways to sacrifice them, and rewards for their deaths. Blood Artist is a familiar payoff. The trick is balancing all three jobs: a hand full of death triggers looks impressive until you realize nobody has volunteered to die.
Do I still need sacrifice outlets if my commander has one?
These are black-red commanders, but check the current Commander rules and banned list before finalizing a deck. Color identity also applies to the cards in the 99; sharing one of your commander's colors isn't enough if a card has an additional color outside Rakdos.
Which Rakdos Commander Should You Build?
Start with what you want your sacrifices to accomplish. Juri, Master of the Revue makes each one build toward a damage finish. Garna, Bloodfist of Keld gives attacking creatures a chance to replace themselves. Mahadi, Emporium Master helps pay for the next turn. Rakdos, the Muscle offers a fresh selection of spells, provided you're feeding him creatures with meaningful mana values.
Then look at a sample hand. Can you make a creature, sacrifice it, and get something worthwhile back? If the answer is no, another flashy payoff probably won't fix it. Find the missing piece first. The dramatic turns come after the boring parts of the deck work.