20 Best Mardu Commanders: Red-White-Black Decks Ranked
By ElderArticles · Updated 11/21/2026 · 26 min read
Explore 20 of the best Mardu commanders, with ranked red-white-black deck ideas, four synergy cards per commander, key drawbacks, and practical rules tips.
Table of contents
Mardu gives you three very different ways to make a table nervous: a growing army, a graveyard full of second chances, or a sacrifice engine that makes blocking irrelevant. The best Mardu commanders turn those resources into a clear plan for winning, rather than simply giving you access to red, white, and black.
Our top picks are Edgar Markov for Vampires, Dihada, Binder of Wills for resource generation and reanimation, and Isshin, Two Heavens as One for attack-trigger decks. Your best choice depends on which kind of game you want to play.
This list ranks 20 commanders for multiplayer Commander, with four synergy cards and a practical drawback for every selection. It includes established favorites alongside newer options such as Worf, Defiant Commander and Tsagan, Raider Warlord.
Reviewed November 20, 2026. These are editorial rankings based on consistency, access to cards or mana, ability to recover, and ways to finish a game. They are not a win-rate leaderboard or a cEDH tier list. We focus on single-card commanders with a Mardu color identity; partner combinations deserve their own comparison. Card text and Commander legality were checked for this guide.
The best Mardu commanders at a glance
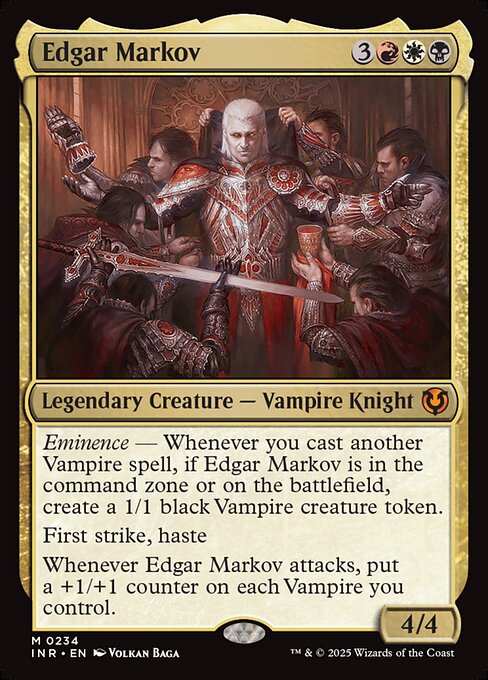
Best Vampire commander: Edgar Markov. An early token engine that works from the command zone.
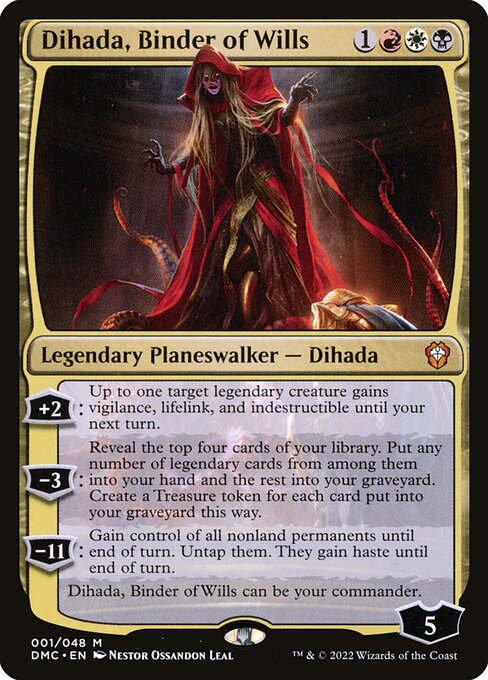
Best for legends and reanimation: Dihada, Binder of Wills. Flexible access to cards, Treasures, and graveyard setup.
Best attack-trigger commander: Isshin, Two Heavens as One. A three-mana engine with a wide range of synergistic creatures.
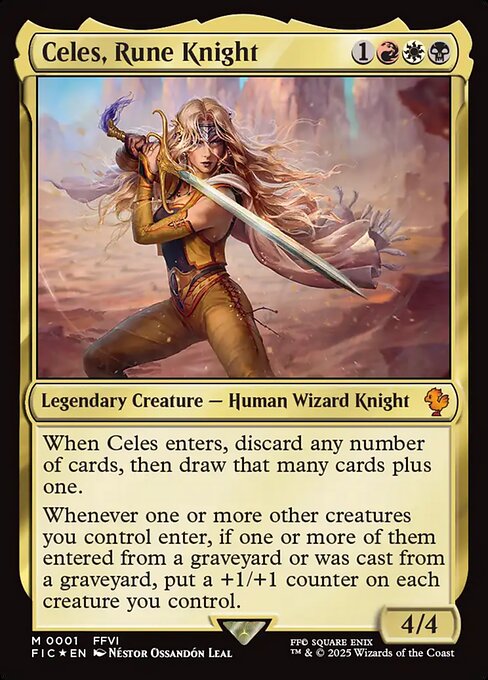
Best for reanimation and counters: Celes, Rune Knight. Discard your reanimation targets, then grow your board as creatures return.
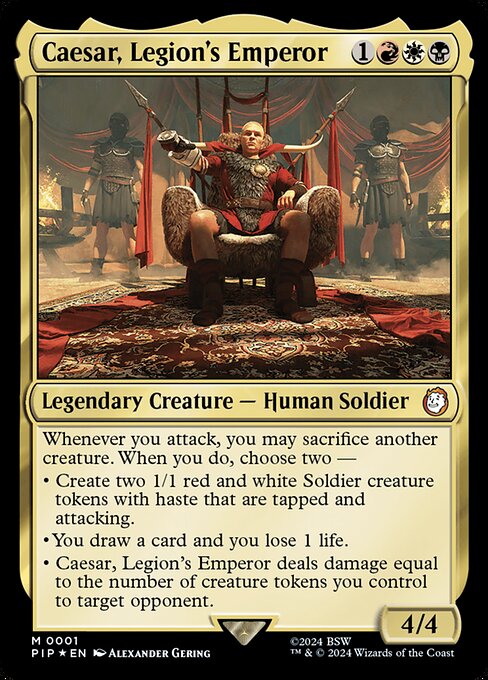
Best token-sacrifice commander: Caesar, Legion's Emperor. Turn attacks into new bodies, cards, or direct damage.
1. Edgar Markov
Edgar Markov | Illustration by Volkan Baǵa
Best for: Vampire players who want pressure before casting their commander.
Edgar earns first place because his core engine works from the command zone. Cast another Vampire spell and eminence gives you an additional Vampire token. Cheap creatures establish an army early, while sacrifice effects and death triggers give that army a purpose when attacking becomes difficult.
Casting Edgar is a finishing option rather than a prerequisite. His haste and attack trigger can turn a board of small Vampires into a much larger threat. A low curve matters more than loading the deck with every impressive six-drop Vampire.
Four cards to build around:
Champion of Dusk: Refills your hand according to your Vampire count. The life loss scales too, so check your total before returning it repeatedly.
Cordial Vampire: Turns creature deaths on either side of the table into counters for your Vampires.
Captivating Vampire: Makes your tokens larger and lets five untapped Vampires take an opposing creature.
Skullclamp: Converts unbuffed 1/1 tokens into two cards. Lords and counters can stop the Equipment from killing them automatically.
The drawback: Edgar asks you to commit heavily to Vampires. He also makes you visibly threatening early, so include ways to recover from sweepers rather than assuming the first army will survive.
2. Dihada, Binder of Wills
Dihada, Binder of Wills | Illustration by Néstor Ossandón Leal
Best for: Players who want legends, graveyard setup, and a large burst of mana.
Dihada's minus-three ability is the reason to build this deck. You can take legendary cards from the four revealed cards, put the rest into your graveyard, and receive Treasures for the cards put there. You may also take none, turning all four into graveyard material and four Treasures.
That choice makes Dihada flexible: she can find resources, help pay for the next spell, or set up a creature to reanimate. Her plus-two helps one legendary creature survive combat and recover life. Although she is a planeswalker, her text specifically permits her to be your commander.
Four cards to build around:
Shanid, Sleepers' Scourge: Draws cards as you cast legendary spells or play legendary lands.
Sevinne's Reclamation: Retrieves a permanent with mana value three or less; flashback also makes it useful after Dihada puts it into the graveyard.
Animate Dead: Turns a creature milled by Dihada into an immediate battlefield threat.
Chainer, Nightmare Adept: Lets you cast a creature from your graveyard and gives haste to nontoken creatures that enter without being cast from your hand.
The drawback: A strong first activation does not guarantee a second one. Dihada needs creatures or interaction to keep opposing attackers from removing her.
3. Isshin, Two Heavens as One
Isshin, Two Heavens as One | Illustration by Ryan Pancoast
Best for: Turning ordinary attacks into multiple layers of value.
Isshin makes relevant attack-triggered abilities of your permanents trigger an additional time. That rewards a deck where attacking already makes tokens, grows creatures, or creates other advantages. He does not need to attack himself to enable the engine.
Build with creatures that pay you for declaring attacks, then add protection so you can keep doing it. Isshin's appeal is how many useful cards become better without requiring a single fragile combo.
Four cards to build around:
Adeline, Resplendent Cathar: Her attack trigger produces a token for each opponent; Isshin supplies a second trigger.
Anim Pakal, Thousandth Moon: Two qualifying attack triggers mean two counter increases and two batches of Gnomes, with the second batch counting the larger counter total.
Krenko, Tin Street Kingpin: Each attack trigger adds a counter before counting Krenko's power for Goblin production.
Battle Angels of Tyr: Isshin increases the myriad triggers, creating more attacking copies. He does not double their combat-damage triggers.
The drawback: Isshin amplifies an existing board. After a sweeper, an empty battlefield gives him little to work with. Also, a creature entering tapped and attacking has not been declared as an attacker, so it does not create another round of attack triggers.
4. Celes, Rune Knight
Celes, Rune Knight | Illustration by Néstor Ossandón Leal
Best for: Reanimation decks that turn recovered creatures into a growing army.
Celes immediately helps shape your hand: discard any number of cards, then draw that many plus one. That puts expensive creatures into the graveyard while finding the spells that bring them back.
Her second ability adds a counter to every creature you control when other creatures enter under the relevant graveyard condition. This rewards repeated reanimation and recursion with a battlefield that becomes increasingly difficult to fight. Celes combines setup and a payoff, which is why she ranks above commanders that only provide one half of the plan.
Four cards to build around:
Reanimate: Brings back a creature for one mana, at the cost of life equal to its mana value.
Victimize: Exchanges a spare creature for two creatures from your graveyard, returned tapped.
Living Death: Can rebuild your board from the graveyard, but also returns your opponents' creatures, so inspect every graveyard first.
Persist: Returns a nonlegendary creature with a -1/-1 counter; if the creature survives with that counter, Celes's resulting +1/+1 counter can cancel it.
The drawback: Graveyard exile can dismantle a carefully prepared turn. Spread your resources between hand and graveyard. Also remember that one simultaneous group of qualifying creatures produces one Celes trigger, not a separate trigger for every creature in that group.
5. Caesar, Legion's Emperor
Caesar, Legion's Emperor | Illustration by Alexander Gering
Best for: Tokens that can attack, draw cards, or become direct damage.
Caesar rewards attacking with a choice. Sacrifice another creature and choose two of his three outcomes: attacking Soldier tokens, a card at the cost of one life, or damage to an opponent based on your creature-token count.
The flexibility matters. Early attacks can develop your board and hand; later attacks can convert a large token count into damage without needing every token to connect. Caesar himself does not have to be the attacker, which helps a deck with expendable bodies keep its commander safe.
Four cards to build around:
Ophiomancer: Replaces its Snake on each upkeep when you control no Snakes, giving you repeatable sacrifice material.
Adeline, Resplendent Cathar: Adds attacking Humans across the table. Order your attack triggers deliberately if you want the new tokens before Caesar's ability resolves.
Skullclamp: Turns small tokens into cards when you need more resources than Caesar alone provides.
Bastion of Remembrance: Makes your creatures' deaths drain every opponent, supporting a finish through stalled combat.
The drawback: Caesar needs a steady supply of creatures you can afford to lose. A deck packed with payoff enchantments and too few token makers will spend too many turns waiting for its engine to start.
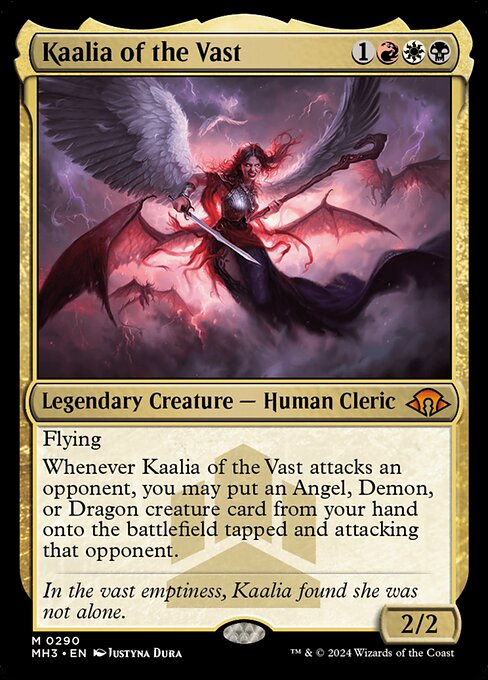
6. Kaalia of the Vast
Kaalia of the Vast | Illustration by Justyna Dura
Best for: Putting enormous Angels, Demons, and Dragons into combat early.
Kaalia offers a dramatic shortcut: when she attacks an opponent, she can put one of her supported creature types from your hand onto the battlefield tapped and attacking that opponent. One attack can bypass a large mana cost and immediately change the game.
Prioritize creatures that do something when they enter or connect in combat, along with ways to grant Kaalia haste and keep her alive. A hand of huge threats is only useful if you can deploy them.
Four cards to build around:
Angel of Despair: Destroys a permanent when it enters, giving Kaalia an answer attached to a large flying attacker.
Rune-Scarred Demon: Finds the card your current position needs as soon as it enters.
Balefire Dragon: Turns combat damage to a player into damage across that player's creatures.
Lightning Greaves: Supplies haste and shroud so Kaalia can attack immediately and resist targeted removal.
The drawback: Repeated removal of Kaalia can strand expensive creatures in your hand. Include a reasonable ramp and reanimation plan. Her ability puts creatures onto the battlefield rather than casting them, and entering attacking does not trigger their own “whenever this creature attacks” abilities.
7. Jan Jansen, Chaos Crafter
Jan Jansen, Chaos Crafter | Illustration by Vladimir Krisetskiy
Best for: Artifact engines with sacrifice, recursion, and token payoffs.
Jan turns an artifact creature into two Treasures, or a noncreature artifact into two Construct artifact creatures. That lets you switch between mana and bodies while triggering abilities that care about artifacts entering or being sacrificed.
His haste allows an activation immediately. The deck becomes stronger when the objects you sacrifice have already replaced themselves or can be recovered cheaply. Jan is a good choice for players who enjoy planning a sequence of small exchanges that adds up to a powerful turn.
Four cards to build around:
Ichor Wellspring: Draws when it enters and when it goes to the graveyard, making it useful material for Jan's Construct-making ability.
Thousand-Year Elixir: Its untap ability gives Jan another activation. Jan already has haste, so the extra activation is the main attraction here.
Goblin Engineer: Sets up an artifact in the graveyard and exchanges a spare artifact for one with mana value three or less.
Reckless Fireweaver: Deals damage to each opponent whenever one of your artifacts enters, turning both token modes into pressure.
The drawback: Jan wants several complementary pieces. Include independent card draw and interaction so removing one payoff does not leave a board of artifacts that accomplishes little.
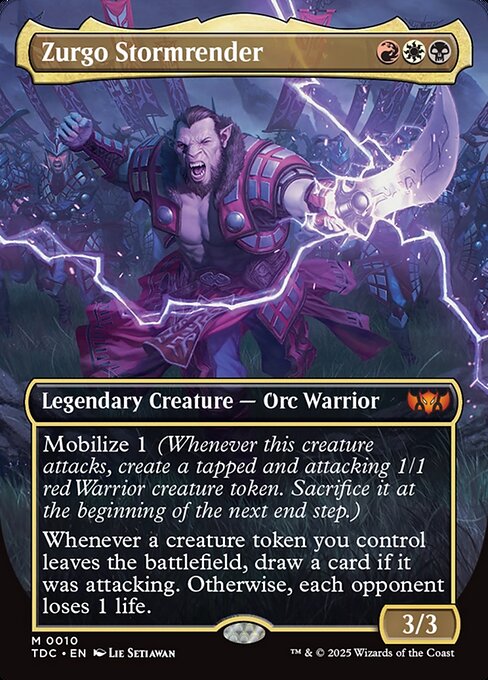
8. Zurgo Stormrender
Zurgo Stormrender | Illustration by Lie Setiawan
Best for: Getting value from creature tokens that were never meant to last.
Zurgo's mobilize ability creates a temporary attacking Warrior. His other ability rewards any creature token you control leaving the battlefield: you draw if it was attacking, or each opponent loses a life otherwise.
This makes timing a real deckbuilding tool. A token sacrificed while attacking can become a card; the same token sacrificed at the next end step produces life loss instead. You can choose what the deck needs, provided you have a sacrifice outlet and understand when the creature is still attacking.
Four cards to build around:
Goblin Bombardment: Sacrifices a token whenever you have priority, letting you choose the timing while adding damage.
Skullclamp: Draws two cards when an equipped token dies, while Zurgo gives his own separate reward.
Elas il-Kor, Sadistic Pilgrim: Adds life gain on other creatures entering and opponent life loss on other creatures dying.
Secure the Wastes: Produces a scalable supply of Warriors at instant speed for blocking, future attacks, or sacrifice.
The drawback: You cannot choose both of Zurgo's rewards for the same departing token. Also, a token exiled or returned to hand can trigger Zurgo, but it did not die and will not trigger effects that specifically require a death.
9. Fire Lord Zuko
Fire Lord Zuko | Illustration by Jo Cordisco
Best for: Growing an army through exile casting and blink effects.
Zuko puts a +1/+1 counter on each of your creatures when you cast a spell from exile and when a permanent you control enters from exile. A permanent spell cast from exile can therefore create one trigger when cast and another when it enters. The new creature usually receives only the entry counter, since it was not yet on the battlefield for the cast trigger.
The plan works best with inexpensive ways to access exile and enough creatures to benefit from the counters. Firebending can help fund plays during combat, but that mana does not last into your postcombat main phase.
Four cards to build around:
Professional Face-Breaker: Turns combat damage into Treasures, then lets you sacrifice Treasures to access cards from exile.
Laelia, the Blade Reforged: Exiles a card to play when she attacks and provides a growing, hasty threat.
Ephemerate: Blinks another creature for an entry-from-exile trigger; casting it through rebound supplies an additional exile-casting trigger next upkeep.
Wrenn's Resolve: Gives you two cards to play from exile through the end of your next turn.
The drawback: Zuko needs both enablers and a battlefield worth growing. Exile access also does not waive mana costs, spell timing, or your normal land-play limit unless an effect says otherwise.
10. Vihaan, Goldwaker
Vihaan, Goldwaker | Illustration by Magali Villeneuve
Best for: Treasure production that doubles as a combat plan.
Vihaan can turn your Treasures into 3/3 Construct Assassin artifact creatures at the beginning of combat on your turn. Since Assassins are outlaws, his other ability gives those creatures vigilance and haste.
That creates an appealing choice: spend Treasures on spells or keep them for a sudden attack. You can also attack with vigilant Treasures and later sacrifice them for mana. The creatures remain artifacts, so artifact synergies continue to matter.
Four cards to build around:
Professional Face-Breaker: Rewards connecting with multiple opponents and offers a way to turn excess Treasures into access to more cards.
Grim Hireling: Produces two Treasures for each player your creatures deal combat damage to and can turn Treasures into creature removal.
Academy Manufactor: Replaces Treasure creation with a Treasure, Clue, and Food, increasing the resources available outside combat.
Clever Concealment: Can phase out your nonland permanents, helping protect the Treasures and creatures you have accumulated.
The drawback: Animating your mana exposes it to creature removal and combat damage. Also, Vihaan's resolved ability only animates the Treasures you controlled at that moment; newly created Treasures do not automatically join that attack.
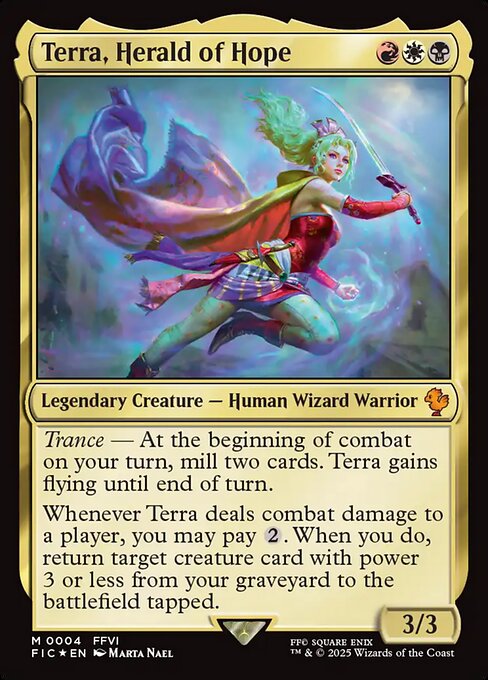
11. Terra, Herald of Hope
Terra, Herald of Hope | Illustration by Marta Nael
Best for: Reusing utility creatures without paying their full mana costs.
Terra mills two cards at the beginning of combat on your turn and gains flying for the turn. When she deals combat damage to a player, you can pay two mana to return a creature with power three or less from your graveyard tapped.
The restriction is power, not mana value. That opens the door to expensive creatures with modest bodies and strong abilities. Terra handles some graveyard setup herself, and her flying helps her connect, making her a useful starting point for a focused reanimation deck.
Four cards to build around:
Solemn Simulacrum: Finds a basic land when it enters and can draw a card when it dies, rewarding repeated trips through the graveyard.
Ravenous Chupacabra: Turns a successful Terra attack into targeted creature removal.
Karmic Guide: Fits Terra's power restriction and can return a second creature without that restriction.
Reconnaissance: Can remove an attacking Terra from a dangerous combat, or untap her during end of combat after she has dealt damage.
The drawback: Terra must connect, and you need the extra two mana available. Reconnaissance can save her, but removing her before damage also means giving up her reanimation trigger that combat.
12. Alesha, Who Smiles at Death
Alesha, Who Smiles at Death | Illustration by Anastasia Ovchinnikova
Best for: A toolbox of small creatures with outsized abilities.
Alesha returns a creature with power two or less tapped and attacking when she attacks and you pay her hybrid-mana cost. That makes her excellent at reusing creatures that search for cards, generate bodies, or reward you when they leave.
She costs only three mana to deploy, but leave room in your mana plan for the reanimation payment. Her first strike helps against some blockers; it does not make every attack safe. Despite having only red mana in her casting cost, the white and black hybrid symbols in her rules text give her a Mardu color identity.
Four cards to build around:
Master of Cruelties: Its one power qualifies for Alesha. Entering attacking bypasses its attack-alone restriction; if it is unblocked, its ability can reduce the defending player's life to one before combat damage. Another unblocked attacker can then finish the job.
Recruiter of the Guard: Finds a creature with toughness two or less, helping assemble your utility package.
Reveillark: Has too much power for Alesha to return, but its leave-the-battlefield ability recovers two creatures from the same small-power toolbox.
Goblin Bombardment: Sacrifices creatures for damage and puts them back where Alesha can reuse them.
The drawback: Graveyard hate and unfavorable combat both disrupt Alesha. The Master of Cruelties line is powerful, but blockers and removal can stop it; it is not an automatic win.
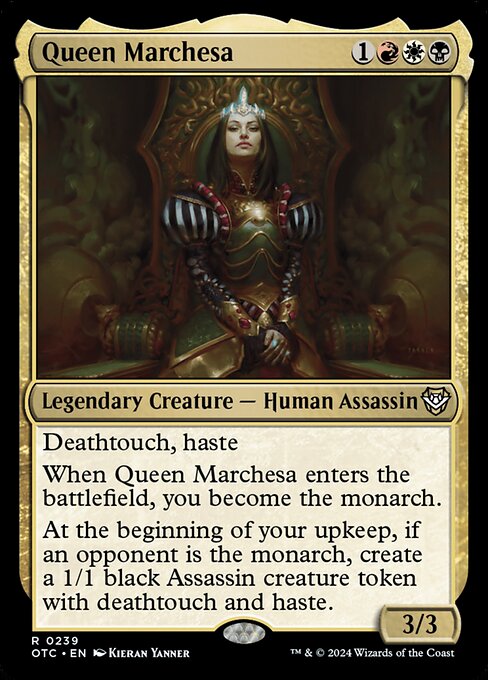
13. Queen Marchesa
Queen Marchesa | Illustration by Kieran Yanner
Best for: Interactive games built around the monarch and table politics.
Marchesa makes you the monarch when she enters, giving you an ongoing reason to defend your life total and an incentive for opponents to attack. If an opponent holds the crown at your upkeep, she supplies a deathtouch Assassin with haste to help contest it.
Her strength is flexibility. You can play removal, defensive creatures, and political effects while using the monarch for cards. The important deckbuilding decision is how you will actually win after establishing control of the game.
Four cards to build around:
Court of Grace: Produces flying blockers, upgrading to Angels while you are the monarch.
Marchesa's Decree: Reclaims the monarchy when it enters and charges opponents life for each creature attacking you or your planeswalkers.
Inkshield: Can turn a large incoming attack into an army of flying Inklings.
Kardur, Doomscourge: Temporarily pushes opponents' creatures into combat against someone other than you when possible.
The drawback: Marchesa supplies cards and incentives, not a built-in finishing engine. Do not spend every slot discouraging attacks while leaving yourself unable to end the game. Politics also loses much of its leverage when only two players remain.
14. Neriv, Heart of the Storm
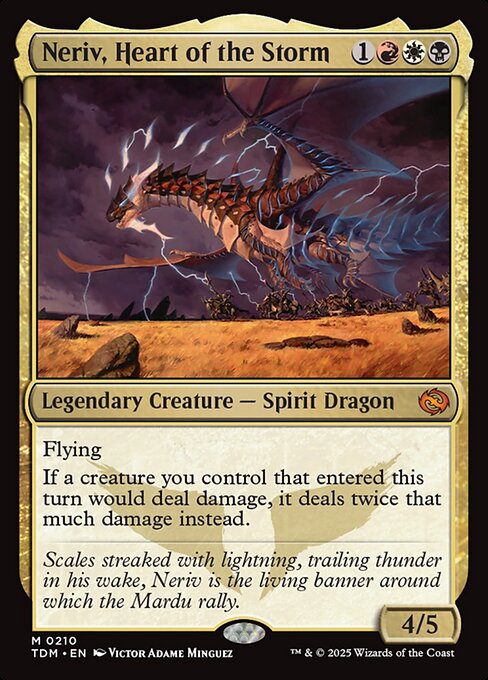
Neriv, Heart of the Storm | Illustration by Victor Adame Minguez
Best for: Hasty creatures and temporary copies that hit much harder than expected.
Neriv doubles damage from creatures you control that entered the battlefield that turn. The effect applies to qualifying creature damage generally, including combat damage, so you want creatures that can contribute immediately.
Haste, temporary tokens, and reanimation with haste are natural directions. The deck rewards careful timing: a creature that arrived last turn does not keep the bonus, and merely putting counters on an old creature does not make it new again.
Four cards to build around:
Ball Lightning: A hasty trampler that threatens twelve damage if unblocked while Neriv is present.
Lightning Skelemental: Combines the same six-power burst with a discard trigger when it damages a player.
Feldon of the Third Path: Creates hasty token copies of creatures in your graveyard, making them eligible for Neriv that turn.
Flamerush Rider: Can arrive through dash and create another attacking copy, giving you multiple newly entered damage sources.
The drawback: Neriv does not replenish your hand or rebuild your board. Balance explosive threats with draw and recursion. Damage doubling also happens after combat damage is assigned, so trample does not simply let you assign all six of Ball Lightning's damage to a player through a blocker.
15. Extus, Oriq Overlord // Awaken the Blood Avatar
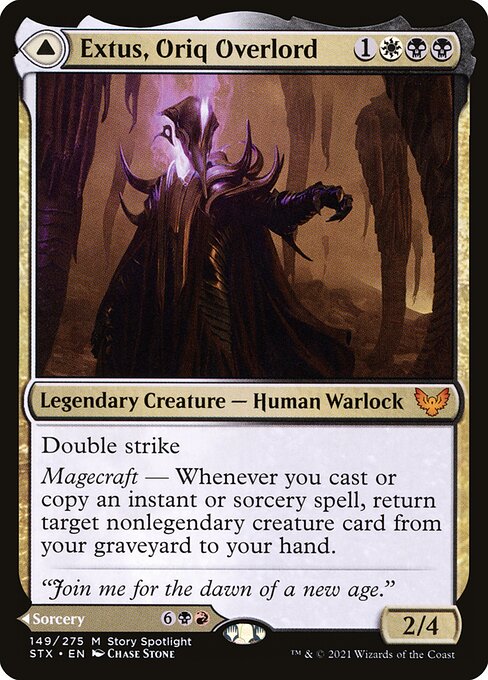
Extus, Oriq Overlord | Illustration by Chase Stone
Awaken the Blood Avatar | Illustration by Kekai Kotaki
Best for: A sacrifice deck with two distinct uses for its commander card.
Extus has a useful front face: casting or copying an instant or sorcery can return a nonlegendary creature card from your graveyard to your hand. His reverse face, Awaken the Blood Avatar, is often the centerpiece. It makes each opponent sacrifice a creature and creates a hasty Avatar whose attacks damage every opponent.
You can sacrifice creatures to reduce the Avatar spell's generic cost. That encourages cheap bodies, renewable token production, and spells that keep your hand moving. You may cast either face from the command zone, and casts of either face contribute to the same commander tax.
Four cards to build around:
Young Pyromancer: Makes Elementals when you cast instants and sorceries, providing material for a later Avatar cast.
Sedgemoor Witch: Produces Pests from casting or copying those spells, with a little life returned when the Pests die.
Ophiomancer: Supplies repeated Snakes if you keep sacrificing the previous one before a later upkeep.
Village Rites: Exchanges a creature for two cards; with Extus on the battlefield, casting it also triggers his recursion ability.
The drawback: You need sacrifice material before paying for Awaken the Blood Avatar. Tokens triggered by casting that spell arrive too late to help pay for the same cast. Its reduction can offset generic commander tax, but cannot remove the required black and red mana.
16. Shanid, Sleepers' Scourge
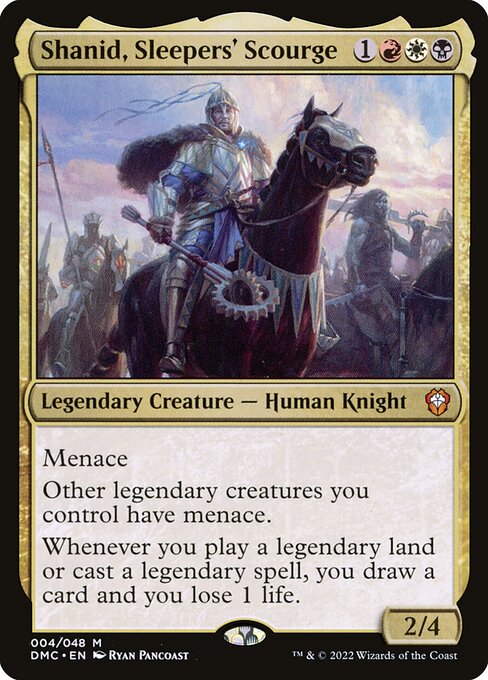
Shanid, Sleepers' Scourge | Illustration by Ryan Pancoast
Best for: Legendary creatures backed by steady card draw.
Shanid draws you a card and costs you one life whenever you play a legendary land or cast a legendary spell. He also gives your other legendary creatures menace, helping a collection of individually useful threats get through blockers.
This is a straightforward way to build Mardu midrange: play legends that answer problems or generate resources, draw into the next one, and eventually attack with a threatening board. Unlike Dihada, Shanid rewards keeping the spells flowing rather than producing a large one-turn burst.
Four cards to build around:
Relic of Legends: Provides mana itself and lets you tap untapped legendary creatures for additional mana.
Jhoira's Familiar: Reduces the generic cost of historic spells, including your legendary spells.
Eiganjo, Seat of the Empire: A legendary land that triggers Shanid when played, with a separate channel option when you need removal instead.
Shizo, Death's Storehouse: Another legendary land, with an activated ability that can help a legendary attacker get through some boards.
The drawback: A legend-heavy list can become top-heavy and lose access to efficient nonlegendary support. Shanid also cares about casting legendary spells, not simply reanimating legendary creatures, and channeling Eiganjo does not count as playing a legendary land.
17. Tsagan, Raider Warlord
Tsagan, Raider Warlord | Illustration by Brian Valeza
Best for: First-strike and double-strike creatures attacking together.
Tsagan has double strike and gives your creatures an attack-triggered power boost based on how many creatures you control have first strike or double strike. At maximum speed, Tsagan gains deathtouch and your other creatures gain first strike, making combat much more difficult for opponents.
You want early creatures that contribute to the count, ways to keep dealing damage across successive turns, and a board large enough to turn the eventual boost into a meaningful attack. Speed can increase only once on each of your turns, so one huge attack does not race straight from speed one to four.
Four cards to build around:
Fencing Ace: An inexpensive double-striker that increases Tsagan's count and uses a power boost twice in combat.
Blade Historian: Gives your attacking creatures double strike, improving both their damage and the number Tsagan can count when the trigger resolves.
Hanweir Garrison: Builds the army with attacking Humans. You can resolve its token-making trigger before Tsagan's boost.
Boros Charm: Can protect your permanents with indestructible or give a creature double strike for a decisive combat.
The drawback: Tsagan needs a board and successive turns to reach the full plan. A sweeper before the major attack can undo much of that preparation, so avoid building exclusively around the maximum-speed payoff.
18. Worf, Defiant Commander
Worf, Defiant Commander | Illustration by Flavio Greco Paglia
Best for: Attacking multiple opponents and turning combat into more cards to play.
Worf brings a hasty Klingon Warrior token when he enters, then rewards attacks by exiling cards according to the number of opponents you attacked that turn. You can play those cards through the end of your next turn, giving you more time to use them than a same-turn-only effect.
The deck wants enough attackers to pressure multiple players without throwing away its board. Worf gives it access to more spells, but you still need mana to cast those spells and a curve that lets you use the extra resources.
Four cards to build around:
Adeline, Resplendent Cathar: Builds an attacking army around the table and leaves you more creatures for future attack declarations.
Professional Face-Breaker: Produces Treasures when your creatures connect with different players, helping pay for Worf's exiled cards.
Reconnaissance: Lets you declare attacks, receive attack triggers, and withdraw creatures from bad combats before damage.
Dolmen Gate: Prevents combat damage to your attacking creatures, supporting attacks across multiple opposing boards.
The drawback: Worf costs five mana, and the cards he exiles still follow normal casting rules. Declare attackers at the opponents you want counted: creatures entering already attacking do not count as having attacked those opponents, and attacking only a planeswalker or battle does not count as attacking its player.
19. Mr. House, President and CEO
Mr. House, President and CEO | Illustration by Joseph Meehan
Best for: Dice rolls that produce an artifact army.
Mr. House turns rolls of four or higher into 3/3 Robots, with a Treasure added for results of six or higher. His own activated ability rolls more six-sided dice when you spend mana from Treasures on it, giving the deck a way to reinvest its resources.
He also works with dice other than d6s, which makes repeatable d20 effects attractive. Build the deck so its tokens and artifacts still matter when you are not assembling a perfect sequence of rolls.
Four cards to build around:
Wyll, Blade of Frontiers: Adds an extra die and ignores the lowest result, improving your chances of useful outcomes.
Barbarian Class: Offers a similar dice modifier, then can provide menace and eventually haste as you level it up.
Delina, Wild Mage: Rolls a d20 when she attacks and makes temporary creature copies, supporting both House's rewards and combat.
Brazen Dwarf: Deals damage to every opponent when you roll one or more dice, providing another payoff alongside the Robots.
The drawback: Dice introduce variance, and House's own ability requires four mana plus tapping him. Extra dice that an effect tells you to ignore do not generate rewards from their ignored results. Include artifact payoffs and dependable draw rather than relying on every roll going your way.
20. Syr Gwyn, Hero of Ashvale
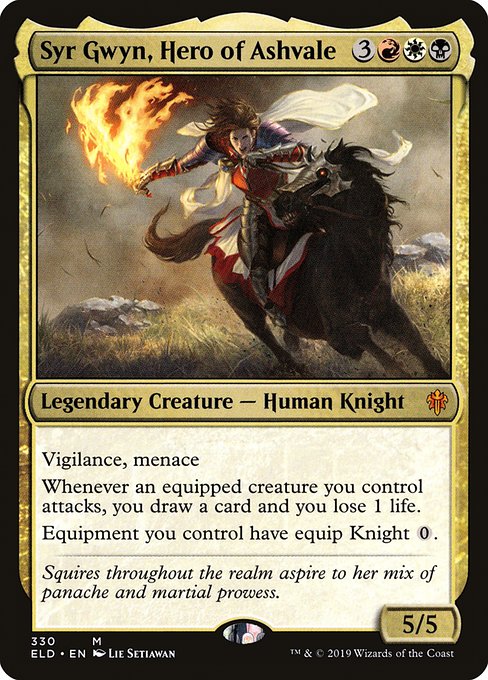
Syr Gwyn, Hero of Ashvale | Illustration by Lie Setiawan
Best for: Knights carrying Equipment that would otherwise be expensive to attach.
Syr Gwyn gives your Equipment an equip Knight cost of zero and draws a card at the cost of one life whenever an equipped creature you control attacks. That can turn a board of equipped Knights into a serious attack and a large refill.
Her own vigilance and menace make her a useful carrier, but she is stronger when the rest of the deck functions before she arrives. Play enough early creatures and Equipment to avoid spending six mana on a commander with nothing ready to support her.
Four cards to build around:
Colossus Hammer: A huge power boost whose normal equip cost becomes much easier to manage with Syr Gwyn and a Knight.
Puresteel Paladin: Draws cards when Equipment enters and can provide equip zero through metalcraft before Syr Gwyn arrives.
Knight of the White Orchid: An early Knight that can find a Plains when an opponent controls more lands.
Fervent Champion: Supplies a cheap, hasty Knight and reduces equip costs targeting itself, helping the Equipment plan start early.
The drawback: Six mana is a substantial investment, and commander tax makes repeated removal painful. Equip Knight zero also follows the usual equip timing rules; it does not let you move Equipment in the middle of combat without another effect permitting it.
Which Mardu commander should you build?
Choose the game actions you enjoy repeating. A commander you want to cast and play for ten games is a better starting point than a ranking alone.
Vampire army — Edgar Markov: Choose him when you want cheap creature spells to produce additional bodies from the start.
Attack triggers — Isshin, Two Heavens as One: Start here if you enjoy combat decisions and creatures that generate value by attacking.
Reanimation — Celes, Rune Knight: Her setup and counter rewards make returning creatures the center of the deck.
Legends and resources — Dihada, Binder of Wills: Choose her for flexible turns built around Treasures and the graveyard.
Tokens and sacrifice — Caesar, Legion's Emperor: A good fit when you want each attack to offer several useful choices.
Artifact engines — Jan Jansen, Chaos Crafter: Pick Jan if exchanging, sacrificing, and recovering artifacts is the appeal.
Politics — Queen Marchesa: Choose the monarch plan if you enjoy interactive games and negotiating attacks.
Star Trek combat — Worf, Defiant Commander: His plan rewards spreading your attacks across multiple opponents.
Building a reliable Mardu deck
Start with a 100-card Commander deck, including your commander, and keep every card within its color identity. A Mardu commander permits cards whose color identities contain only red, white, black, or any combination of those colors, as well as colorless cards.
For a first draft, around 36–38 lands and 10 ramp pieces are useful starting points, then adjust after testing your curve and early turns. These are deckbuilding guidelines, not format requirements. Kaalia and Syr Gwyn need a different mana plan from a low-curve Edgar deck, while Treasures only help if you can produce them reliably.
Reserve room for interaction, graveyard hate, and protection. Keep some card draw that works without your commander, and decide what ends the game: overwhelming combat, repeated drain, direct damage, or a clearly understood combo. A pile of efficient sacrifice cards still needs something worth sacrificing and a payoff that makes the exchanges matter.
Mardu Commander FAQ
What colors are Mardu?
Mardu is red, white, and black. Commander deckbuilding uses color identity, which includes relevant mana symbols in a card's rules text as well as its mana cost. That is why Alesha belongs in this list despite her red-only casting cost.
What is the best Mardu commander for a first deck?
Isshin is our recommendation for a player who enjoys combat: choose useful attack triggers, build a board, and protect it. Edgar is a clear alternative if you specifically want Vampires. Neither choice removes the need for a balanced mana base and interaction.
Are these rankings also a cEDH tier list?
No. They weigh multiplayer deckbuilding appeal, consistency, recovery, and finishing power across a range of regular Commander games. Competitive results, partner combinations, and specific fast-combo lists would require a different comparison.
Can Dihada be a commander even though she is a planeswalker?
Yes. Dihada, Binder of Wills explicitly says she can be your commander. Being a legendary planeswalker alone does not grant that permission.
Start building your Mardu deck
Choose your favorite commander and use the Create a deck button beside its section to start a list. You can also open the free ElderDecks Commander deck builder, compare your options, and test whether your ramp, draw, and payoff cards support the same plan.
Which Mardu strategy would you build first: attacking, sacrificing, reanimating, or playing politics?
Sources and card references
Card text, color identities, and Commander legality were checked on November 20, 2026. The rankings and deckbuilding recommendations are ElderDecks editorial judgments.
Each featured card image below its heading includes the illustrator credit. Card images are provided via Scryfall; Magic: The Gathering artwork and card designs belong to Wizards of the Coast and their respective rights holders.
20 Best Mardu Commanders: Red-White-Black Decks Ranked
By ElderArticles · Updated 11/21/2026 · 26 min read
Explore 20 of the best Mardu commanders, with ranked red-white-black deck ideas, four synergy cards per commander, key drawbacks, and practical rules tips.
Mardu gives you three very different ways to make a table nervous: a growing army, a graveyard full of second chances, or a sacrifice engine that makes blocking irrelevant. The best Mardu commanders turn those resources into a clear plan for winning, rather than simply giving you access to red, white, and black.
This list ranks 20 commanders for multiplayer Commander, with four synergy cards and a practical drawback for every selection. It includes established favorites alongside newer options such as Worf, Defiant Commander and Tsagan, Raider Warlord.
Reviewed November 20, 2026. These are editorial rankings based on consistency, access to cards or mana, ability to recover, and ways to finish a game. They are not a win-rate leaderboard or a cEDH tier list. We focus on single-card commanders with a Mardu color identity; partner combinations deserve their own comparison. Card text and Commander legality were checked for this guide.
The best Mardu commanders at a glance
Best Vampire commander: Edgar Markov. An early token engine that works from the command zone.
Best for legends and reanimation: Dihada, Binder of Wills. Flexible access to cards, Treasures, and graveyard setup.
Best attack-trigger commander: Isshin, Two Heavens as One. A three-mana engine with a wide range of synergistic creatures.
Best for reanimation and counters: Celes, Rune Knight. Discard your reanimation targets, then grow your board as creatures return.
Best token-sacrifice commander: Caesar, Legion's Emperor. Turn attacks into new bodies, cards, or direct damage.
Best for: Vampire players who want pressure before casting their commander.
Edgar earns first place because his core engine works from the command zone. Cast another Vampire spell and eminence gives you an additional Vampire token. Cheap creatures establish an army early, while sacrifice effects and death triggers give that army a purpose when attacking becomes difficult.
Casting Edgar is a finishing option rather than a prerequisite. His haste and attack trigger can turn a board of small Vampires into a much larger threat. A low curve matters more than loading the deck with every impressive six-drop Vampire.
Four cards to build around:
Champion of Dusk: Refills your hand according to your Vampire count. The life loss scales too, so check your total before returning it repeatedly.
Cordial Vampire: Turns creature deaths on either side of the table into counters for your Vampires.
Captivating Vampire: Makes your tokens larger and lets five untapped Vampires take an opposing creature.
Skullclamp: Converts unbuffed 1/1 tokens into two cards. Lords and counters can stop the Equipment from killing them automatically.
The drawback: Edgar asks you to commit heavily to Vampires. He also makes you visibly threatening early, so include ways to recover from sweepers rather than assuming the first army will survive.
Best for: Players who want legends, graveyard setup, and a large burst of mana.
Dihada's minus-three ability is the reason to build this deck. You can take legendary cards from the four revealed cards, put the rest into your graveyard, and receive Treasures for the cards put there. You may also take none, turning all four into graveyard material and four Treasures.
That choice makes Dihada flexible: she can find resources, help pay for the next spell, or set up a creature to reanimate. Her plus-two helps one legendary creature survive combat and recover life. Although she is a planeswalker, her text specifically permits her to be your commander.
Sevinne's Reclamation: Retrieves a permanent with mana value three or less; flashback also makes it useful after Dihada puts it into the graveyard.
Animate Dead: Turns a creature milled by Dihada into an immediate battlefield threat.
Chainer, Nightmare Adept: Lets you cast a creature from your graveyard and gives haste to nontoken creatures that enter without being cast from your hand.
The drawback: A strong first activation does not guarantee a second one. Dihada needs creatures or interaction to keep opposing attackers from removing her.
Best for: Turning ordinary attacks into multiple layers of value.
Isshin makes relevant attack-triggered abilities of your permanents trigger an additional time. That rewards a deck where attacking already makes tokens, grows creatures, or creates other advantages. He does not need to attack himself to enable the engine.
Build with creatures that pay you for declaring attacks, then add protection so you can keep doing it. Isshin's appeal is how many useful cards become better without requiring a single fragile combo.
Four cards to build around:
Adeline, Resplendent Cathar: Her attack trigger produces a token for each opponent; Isshin supplies a second trigger.
Anim Pakal, Thousandth Moon: Two qualifying attack triggers mean two counter increases and two batches of Gnomes, with the second batch counting the larger counter total.
Battle Angels of Tyr: Isshin increases the myriad triggers, creating more attacking copies. He does not double their combat-damage triggers.
The drawback: Isshin amplifies an existing board. After a sweeper, an empty battlefield gives him little to work with. Also, a creature entering tapped and attacking has not been declared as an attacker, so it does not create another round of attack triggers.
Best for: Reanimation decks that turn recovered creatures into a growing army.
Celes immediately helps shape your hand: discard any number of cards, then draw that many plus one. That puts expensive creatures into the graveyard while finding the spells that bring them back.
Her second ability adds a counter to every creature you control when other creatures enter under the relevant graveyard condition. This rewards repeated reanimation and recursion with a battlefield that becomes increasingly difficult to fight. Celes combines setup and a payoff, which is why she ranks above commanders that only provide one half of the plan.
Four cards to build around:
Reanimate: Brings back a creature for one mana, at the cost of life equal to its mana value.
Victimize: Exchanges a spare creature for two creatures from your graveyard, returned tapped.
Living Death: Can rebuild your board from the graveyard, but also returns your opponents' creatures, so inspect every graveyard first.
Persist: Returns a nonlegendary creature with a -1/-1 counter; if the creature survives with that counter, Celes's resulting +1/+1 counter can cancel it.
The drawback: Graveyard exile can dismantle a carefully prepared turn. Spread your resources between hand and graveyard. Also remember that one simultaneous group of qualifying creatures produces one Celes trigger, not a separate trigger for every creature in that group.
Best for: Tokens that can attack, draw cards, or become direct damage.
Caesar rewards attacking with a choice. Sacrifice another creature and choose two of his three outcomes: attacking Soldier tokens, a card at the cost of one life, or damage to an opponent based on your creature-token count.
The flexibility matters. Early attacks can develop your board and hand; later attacks can convert a large token count into damage without needing every token to connect. Caesar himself does not have to be the attacker, which helps a deck with expendable bodies keep its commander safe.
Four cards to build around:
Ophiomancer: Replaces its Snake on each upkeep when you control no Snakes, giving you repeatable sacrifice material.
Adeline, Resplendent Cathar: Adds attacking Humans across the table. Order your attack triggers deliberately if you want the new tokens before Caesar's ability resolves.
Skullclamp: Turns small tokens into cards when you need more resources than Caesar alone provides.
Bastion of Remembrance: Makes your creatures' deaths drain every opponent, supporting a finish through stalled combat.
The drawback: Caesar needs a steady supply of creatures you can afford to lose. A deck packed with payoff enchantments and too few token makers will spend too many turns waiting for its engine to start.
Best for: Putting enormous Angels, Demons, and Dragons into combat early.
Kaalia offers a dramatic shortcut: when she attacks an opponent, she can put one of her supported creature types from your hand onto the battlefield tapped and attacking that opponent. One attack can bypass a large mana cost and immediately change the game.
Prioritize creatures that do something when they enter or connect in combat, along with ways to grant Kaalia haste and keep her alive. A hand of huge threats is only useful if you can deploy them.
Four cards to build around:
Angel of Despair: Destroys a permanent when it enters, giving Kaalia an answer attached to a large flying attacker.
Rune-Scarred Demon: Finds the card your current position needs as soon as it enters.
Balefire Dragon: Turns combat damage to a player into damage across that player's creatures.
Lightning Greaves: Supplies haste and shroud so Kaalia can attack immediately and resist targeted removal.
The drawback: Repeated removal of Kaalia can strand expensive creatures in your hand. Include a reasonable ramp and reanimation plan. Her ability puts creatures onto the battlefield rather than casting them, and entering attacking does not trigger their own “whenever this creature attacks” abilities.
Best for: Artifact engines with sacrifice, recursion, and token payoffs.
Jan turns an artifact creature into two Treasures, or a noncreature artifact into two Construct artifact creatures. That lets you switch between mana and bodies while triggering abilities that care about artifacts entering or being sacrificed.
His haste allows an activation immediately. The deck becomes stronger when the objects you sacrifice have already replaced themselves or can be recovered cheaply. Jan is a good choice for players who enjoy planning a sequence of small exchanges that adds up to a powerful turn.
Four cards to build around:
Ichor Wellspring: Draws when it enters and when it goes to the graveyard, making it useful material for Jan's Construct-making ability.
Thousand-Year Elixir: Its untap ability gives Jan another activation. Jan already has haste, so the extra activation is the main attraction here.
Goblin Engineer: Sets up an artifact in the graveyard and exchanges a spare artifact for one with mana value three or less.
Reckless Fireweaver: Deals damage to each opponent whenever one of your artifacts enters, turning both token modes into pressure.
The drawback: Jan wants several complementary pieces. Include independent card draw and interaction so removing one payoff does not leave a board of artifacts that accomplishes little.
Best for: Getting value from creature tokens that were never meant to last.
Zurgo's mobilize ability creates a temporary attacking Warrior. His other ability rewards any creature token you control leaving the battlefield: you draw if it was attacking, or each opponent loses a life otherwise.
This makes timing a real deckbuilding tool. A token sacrificed while attacking can become a card; the same token sacrificed at the next end step produces life loss instead. You can choose what the deck needs, provided you have a sacrifice outlet and understand when the creature is still attacking.
Four cards to build around:
Goblin Bombardment: Sacrifices a token whenever you have priority, letting you choose the timing while adding damage.
Skullclamp: Draws two cards when an equipped token dies, while Zurgo gives his own separate reward.
Elas il-Kor, Sadistic Pilgrim: Adds life gain on other creatures entering and opponent life loss on other creatures dying.
Secure the Wastes: Produces a scalable supply of Warriors at instant speed for blocking, future attacks, or sacrifice.
The drawback: You cannot choose both of Zurgo's rewards for the same departing token. Also, a token exiled or returned to hand can trigger Zurgo, but it did not die and will not trigger effects that specifically require a death.
Best for: Growing an army through exile casting and blink effects.
Zuko puts a +1/+1 counter on each of your creatures when you cast a spell from exile and when a permanent you control enters from exile. A permanent spell cast from exile can therefore create one trigger when cast and another when it enters. The new creature usually receives only the entry counter, since it was not yet on the battlefield for the cast trigger.
The plan works best with inexpensive ways to access exile and enough creatures to benefit from the counters. Firebending can help fund plays during combat, but that mana does not last into your postcombat main phase.
Four cards to build around:
Professional Face-Breaker: Turns combat damage into Treasures, then lets you sacrifice Treasures to access cards from exile.
Laelia, the Blade Reforged: Exiles a card to play when she attacks and provides a growing, hasty threat.
Ephemerate: Blinks another creature for an entry-from-exile trigger; casting it through rebound supplies an additional exile-casting trigger next upkeep.
Wrenn's Resolve: Gives you two cards to play from exile through the end of your next turn.
The drawback: Zuko needs both enablers and a battlefield worth growing. Exile access also does not waive mana costs, spell timing, or your normal land-play limit unless an effect says otherwise.
Best for: Treasure production that doubles as a combat plan.
Vihaan can turn your Treasures into 3/3 Construct Assassin artifact creatures at the beginning of combat on your turn. Since Assassins are outlaws, his other ability gives those creatures vigilance and haste.
That creates an appealing choice: spend Treasures on spells or keep them for a sudden attack. You can also attack with vigilant Treasures and later sacrifice them for mana. The creatures remain artifacts, so artifact synergies continue to matter.
Four cards to build around:
Professional Face-Breaker: Rewards connecting with multiple opponents and offers a way to turn excess Treasures into access to more cards.
Grim Hireling: Produces two Treasures for each player your creatures deal combat damage to and can turn Treasures into creature removal.
Academy Manufactor: Replaces Treasure creation with a Treasure, Clue, and Food, increasing the resources available outside combat.
Clever Concealment: Can phase out your nonland permanents, helping protect the Treasures and creatures you have accumulated.
The drawback: Animating your mana exposes it to creature removal and combat damage. Also, Vihaan's resolved ability only animates the Treasures you controlled at that moment; newly created Treasures do not automatically join that attack.
Best for: Reusing utility creatures without paying their full mana costs.
Terra mills two cards at the beginning of combat on your turn and gains flying for the turn. When she deals combat damage to a player, you can pay two mana to return a creature with power three or less from your graveyard tapped.
The restriction is power, not mana value. That opens the door to expensive creatures with modest bodies and strong abilities. Terra handles some graveyard setup herself, and her flying helps her connect, making her a useful starting point for a focused reanimation deck.
Four cards to build around:
Solemn Simulacrum: Finds a basic land when it enters and can draw a card when it dies, rewarding repeated trips through the graveyard.
Ravenous Chupacabra: Turns a successful Terra attack into targeted creature removal.
Karmic Guide: Fits Terra's power restriction and can return a second creature without that restriction.
Reconnaissance: Can remove an attacking Terra from a dangerous combat, or untap her during end of combat after she has dealt damage.
The drawback: Terra must connect, and you need the extra two mana available. Reconnaissance can save her, but removing her before damage also means giving up her reanimation trigger that combat.
Best for: A toolbox of small creatures with outsized abilities.
Alesha returns a creature with power two or less tapped and attacking when she attacks and you pay her hybrid-mana cost. That makes her excellent at reusing creatures that search for cards, generate bodies, or reward you when they leave.
She costs only three mana to deploy, but leave room in your mana plan for the reanimation payment. Her first strike helps against some blockers; it does not make every attack safe. Despite having only red mana in her casting cost, the white and black hybrid symbols in her rules text give her a Mardu color identity.
Four cards to build around:
Master of Cruelties: Its one power qualifies for Alesha. Entering attacking bypasses its attack-alone restriction; if it is unblocked, its ability can reduce the defending player's life to one before combat damage. Another unblocked attacker can then finish the job.
Recruiter of the Guard: Finds a creature with toughness two or less, helping assemble your utility package.
Reveillark: Has too much power for Alesha to return, but its leave-the-battlefield ability recovers two creatures from the same small-power toolbox.
Goblin Bombardment: Sacrifices creatures for damage and puts them back where Alesha can reuse them.
The drawback: Graveyard hate and unfavorable combat both disrupt Alesha. The Master of Cruelties line is powerful, but blockers and removal can stop it; it is not an automatic win.
Best for: Interactive games built around the monarch and table politics.
Marchesa makes you the monarch when she enters, giving you an ongoing reason to defend your life total and an incentive for opponents to attack. If an opponent holds the crown at your upkeep, she supplies a deathtouch Assassin with haste to help contest it.
Her strength is flexibility. You can play removal, defensive creatures, and political effects while using the monarch for cards. The important deckbuilding decision is how you will actually win after establishing control of the game.
Four cards to build around:
Court of Grace: Produces flying blockers, upgrading to Angels while you are the monarch.
Marchesa's Decree: Reclaims the monarchy when it enters and charges opponents life for each creature attacking you or your planeswalkers.
Inkshield: Can turn a large incoming attack into an army of flying Inklings.
Kardur, Doomscourge: Temporarily pushes opponents' creatures into combat against someone other than you when possible.
The drawback: Marchesa supplies cards and incentives, not a built-in finishing engine. Do not spend every slot discouraging attacks while leaving yourself unable to end the game. Politics also loses much of its leverage when only two players remain.
Best for: Hasty creatures and temporary copies that hit much harder than expected.
Neriv doubles damage from creatures you control that entered the battlefield that turn. The effect applies to qualifying creature damage generally, including combat damage, so you want creatures that can contribute immediately.
Haste, temporary tokens, and reanimation with haste are natural directions. The deck rewards careful timing: a creature that arrived last turn does not keep the bonus, and merely putting counters on an old creature does not make it new again.
Four cards to build around:
Ball Lightning: A hasty trampler that threatens twelve damage if unblocked while Neriv is present.
Lightning Skelemental: Combines the same six-power burst with a discard trigger when it damages a player.
Feldon of the Third Path: Creates hasty token copies of creatures in your graveyard, making them eligible for Neriv that turn.
Flamerush Rider: Can arrive through dash and create another attacking copy, giving you multiple newly entered damage sources.
The drawback: Neriv does not replenish your hand or rebuild your board. Balance explosive threats with draw and recursion. Damage doubling also happens after combat damage is assigned, so trample does not simply let you assign all six of Ball Lightning's damage to a player through a blocker.
Extus, Oriq Overlord | Illustration by Chase Stone
Awaken the Blood Avatar | Illustration by Kekai Kotaki
Best for: A sacrifice deck with two distinct uses for its commander card.
Extus has a useful front face: casting or copying an instant or sorcery can return a nonlegendary creature card from your graveyard to your hand. His reverse face, Awaken the Blood Avatar, is often the centerpiece. It makes each opponent sacrifice a creature and creates a hasty Avatar whose attacks damage every opponent.
You can sacrifice creatures to reduce the Avatar spell's generic cost. That encourages cheap bodies, renewable token production, and spells that keep your hand moving. You may cast either face from the command zone, and casts of either face contribute to the same commander tax.
Four cards to build around:
Young Pyromancer: Makes Elementals when you cast instants and sorceries, providing material for a later Avatar cast.
Sedgemoor Witch: Produces Pests from casting or copying those spells, with a little life returned when the Pests die.
Ophiomancer: Supplies repeated Snakes if you keep sacrificing the previous one before a later upkeep.
Village Rites: Exchanges a creature for two cards; with Extus on the battlefield, casting it also triggers his recursion ability.
The drawback: You need sacrifice material before paying for Awaken the Blood Avatar. Tokens triggered by casting that spell arrive too late to help pay for the same cast. Its reduction can offset generic commander tax, but cannot remove the required black and red mana.
Best for: Legendary creatures backed by steady card draw.
Shanid draws you a card and costs you one life whenever you play a legendary land or cast a legendary spell. He also gives your other legendary creatures menace, helping a collection of individually useful threats get through blockers.
This is a straightforward way to build Mardu midrange: play legends that answer problems or generate resources, draw into the next one, and eventually attack with a threatening board. Unlike Dihada, Shanid rewards keeping the spells flowing rather than producing a large one-turn burst.
Four cards to build around:
Relic of Legends: Provides mana itself and lets you tap untapped legendary creatures for additional mana.
Jhoira's Familiar: Reduces the generic cost of historic spells, including your legendary spells.
Eiganjo, Seat of the Empire: A legendary land that triggers Shanid when played, with a separate channel option when you need removal instead.
Shizo, Death's Storehouse: Another legendary land, with an activated ability that can help a legendary attacker get through some boards.
The drawback: A legend-heavy list can become top-heavy and lose access to efficient nonlegendary support. Shanid also cares about casting legendary spells, not simply reanimating legendary creatures, and channeling Eiganjo does not count as playing a legendary land.
Best for: First-strike and double-strike creatures attacking together.
Tsagan has double strike and gives your creatures an attack-triggered power boost based on how many creatures you control have first strike or double strike. At maximum speed, Tsagan gains deathtouch and your other creatures gain first strike, making combat much more difficult for opponents.
You want early creatures that contribute to the count, ways to keep dealing damage across successive turns, and a board large enough to turn the eventual boost into a meaningful attack. Speed can increase only once on each of your turns, so one huge attack does not race straight from speed one to four.
Four cards to build around:
Fencing Ace: An inexpensive double-striker that increases Tsagan's count and uses a power boost twice in combat.
Blade Historian: Gives your attacking creatures double strike, improving both their damage and the number Tsagan can count when the trigger resolves.
Hanweir Garrison: Builds the army with attacking Humans. You can resolve its token-making trigger before Tsagan's boost.
Boros Charm: Can protect your permanents with indestructible or give a creature double strike for a decisive combat.
The drawback: Tsagan needs a board and successive turns to reach the full plan. A sweeper before the major attack can undo much of that preparation, so avoid building exclusively around the maximum-speed payoff.
Best for: Attacking multiple opponents and turning combat into more cards to play.
Worf brings a hasty Klingon Warrior token when he enters, then rewards attacks by exiling cards according to the number of opponents you attacked that turn. You can play those cards through the end of your next turn, giving you more time to use them than a same-turn-only effect.
The deck wants enough attackers to pressure multiple players without throwing away its board. Worf gives it access to more spells, but you still need mana to cast those spells and a curve that lets you use the extra resources.
Four cards to build around:
Adeline, Resplendent Cathar: Builds an attacking army around the table and leaves you more creatures for future attack declarations.
Professional Face-Breaker: Produces Treasures when your creatures connect with different players, helping pay for Worf's exiled cards.
Reconnaissance: Lets you declare attacks, receive attack triggers, and withdraw creatures from bad combats before damage.
Dolmen Gate: Prevents combat damage to your attacking creatures, supporting attacks across multiple opposing boards.
The drawback: Worf costs five mana, and the cards he exiles still follow normal casting rules. Declare attackers at the opponents you want counted: creatures entering already attacking do not count as having attacked those opponents, and attacking only a planeswalker or battle does not count as attacking its player.
Best for: Dice rolls that produce an artifact army.
Mr. House turns rolls of four or higher into 3/3 Robots, with a Treasure added for results of six or higher. His own activated ability rolls more six-sided dice when you spend mana from Treasures on it, giving the deck a way to reinvest its resources.
He also works with dice other than d6s, which makes repeatable d20 effects attractive. Build the deck so its tokens and artifacts still matter when you are not assembling a perfect sequence of rolls.
Four cards to build around:
Wyll, Blade of Frontiers: Adds an extra die and ignores the lowest result, improving your chances of useful outcomes.
Brazen Dwarf: Deals damage to every opponent when you roll one or more dice, providing another payoff alongside the Robots.
The drawback: Dice introduce variance, and House's own ability requires four mana plus tapping him. Extra dice that an effect tells you to ignore do not generate rewards from their ignored results. Include artifact payoffs and dependable draw rather than relying on every roll going your way.
Best for: Knights carrying Equipment that would otherwise be expensive to attach.
Syr Gwyn gives your Equipment an equip Knight cost of zero and draws a card at the cost of one life whenever an equipped creature you control attacks. That can turn a board of equipped Knights into a serious attack and a large refill.
Her own vigilance and menace make her a useful carrier, but she is stronger when the rest of the deck functions before she arrives. Play enough early creatures and Equipment to avoid spending six mana on a commander with nothing ready to support her.
Four cards to build around:
Colossus Hammer: A huge power boost whose normal equip cost becomes much easier to manage with Syr Gwyn and a Knight.
Puresteel Paladin: Draws cards when Equipment enters and can provide equip zero through metalcraft before Syr Gwyn arrives.
Knight of the White Orchid: An early Knight that can find a Plains when an opponent controls more lands.
Fervent Champion: Supplies a cheap, hasty Knight and reduces equip costs targeting itself, helping the Equipment plan start early.
The drawback: Six mana is a substantial investment, and commander tax makes repeated removal painful. Equip Knight zero also follows the usual equip timing rules; it does not let you move Equipment in the middle of combat without another effect permitting it.
Which Mardu commander should you build?
Choose the game actions you enjoy repeating. A commander you want to cast and play for ten games is a better starting point than a ranking alone.
Vampire army — Edgar Markov: Choose him when you want cheap creature spells to produce additional bodies from the start.
Attack triggers — Isshin, Two Heavens as One: Start here if you enjoy combat decisions and creatures that generate value by attacking.
Reanimation — Celes, Rune Knight: Her setup and counter rewards make returning creatures the center of the deck.
Legends and resources — Dihada, Binder of Wills: Choose her for flexible turns built around Treasures and the graveyard.
Tokens and sacrifice — Caesar, Legion's Emperor: A good fit when you want each attack to offer several useful choices.
Artifact engines — Jan Jansen, Chaos Crafter: Pick Jan if exchanging, sacrificing, and recovering artifacts is the appeal.
Politics — Queen Marchesa: Choose the monarch plan if you enjoy interactive games and negotiating attacks.
Star Trek combat — Worf, Defiant Commander: His plan rewards spreading your attacks across multiple opponents.
Building a reliable Mardu deck
Start with a 100-card Commander deck, including your commander, and keep every card within its color identity. A Mardu commander permits cards whose color identities contain only red, white, black, or any combination of those colors, as well as colorless cards.
For a first draft, around 36–38 lands and 10 ramp pieces are useful starting points, then adjust after testing your curve and early turns. These are deckbuilding guidelines, not format requirements. Kaalia and Syr Gwyn need a different mana plan from a low-curve Edgar deck, while Treasures only help if you can produce them reliably.
Reserve room for interaction, graveyard hate, and protection. Keep some card draw that works without your commander, and decide what ends the game: overwhelming combat, repeated drain, direct damage, or a clearly understood combo. A pile of efficient sacrifice cards still needs something worth sacrificing and a payoff that makes the exchanges matter.
Mardu Commander FAQ
What colors are Mardu?
Mardu is red, white, and black. Commander deckbuilding uses color identity, which includes relevant mana symbols in a card's rules text as well as its mana cost. That is why Alesha belongs in this list despite her red-only casting cost.
What is the best Mardu commander for a first deck?
Isshin is our recommendation for a player who enjoys combat: choose useful attack triggers, build a board, and protect it. Edgar is a clear alternative if you specifically want Vampires. Neither choice removes the need for a balanced mana base and interaction.
Are these rankings also a cEDH tier list?
No. They weigh multiplayer deckbuilding appeal, consistency, recovery, and finishing power across a range of regular Commander games. Competitive results, partner combinations, and specific fast-combo lists would require a different comparison.
Can Dihada be a commander even though she is a planeswalker?
Yes. Dihada, Binder of Wills explicitly says she can be your commander. Being a legendary planeswalker alone does not grant that permission.
Start building your Mardu deck
Choose your favorite commander and use the Create a deck button beside its section to start a list. You can also open the free ElderDecks Commander deck builder, compare your options, and test whether your ramp, draw, and payoff cards support the same plan.
Which Mardu strategy would you build first: attacking, sacrificing, reanimating, or playing politics?
Sources and card references
Card text, color identities, and Commander legality were checked on November 20, 2026. The rankings and deckbuilding recommendations are ElderDecks editorial judgments.
Each featured card image below its heading includes the illustrator credit. Card images are provided via Scryfall; Magic: The Gathering artwork and card designs belong to Wizards of the Coast and their respective rights holders.